|
|
Post by Bluefront on May 28, 2010 8:45:26 GMT -5
That avatar thing.....seems like you need to re-size the avatar you want to use to exactly 100x100 pixels, before you try to use it. I used Photoshop to re-size it, and then uploaded it to Photobucket. I'm not sure if you can call a less-restrictive exhaust, a "performance" exhaust.....like something dyno-tuned. These engines all need a certain amount of back-pressure to run ok. I always wonder about such things. Getting the right combo of a performance exhaust and a performance air filter is not that easy. I imagine most of these manufacturers just guess at the specs of these things. Who can you believe these days?  |
|
|
|
Post by Bluefront on May 29, 2010 8:40:06 GMT -5
I finally found my old spanner wrench....to adjust the rear shocks. As it was it'll work fine with the air cleaner box removed. If You want to carry it around to make adjustments while you ride, you'll need to shorten the handle (as shown). It's a KOWA 900118, made in Japan....came from a Kawasaki dealer in the '70s. I have no idea where to find one these days.  But it works...... 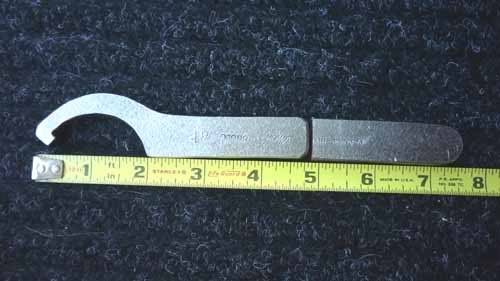 |
|
|
|
Post by misterlucky on May 29, 2010 18:59:17 GMT -5
what an excellent post for the xingyue!! Honest: I would feel jealous as hel...help about all those pics if it weren't for the fact i paid 300 biscuits for my scoot, but the body parts make it look like it cost 200.. Since i'm too cheap to invest the money in the plastic, i resort to duct tape, which makes a perfectly well running scoot look like the ghetto cruiser it is. there were questions, that were answered, about where parts and mods can be purchased...walmart seems to play a big part...they do have the right paint for that rear rack that rack looks cheap, but the design is for strength, allowing me to pick the rear end up to spin the tire...the walmart paint rack has spray colors for vinyl and plastic.. I find most or all the parts i need from http://www.bmsmotorparts.com...and i just found out they changed the page header to china motor parts... i shy away from mods to the plastic body, like removing fenders and stuff...they built this thing like a zen puzzle, and the body has optimum rigidity ONLY when ALL the plastic is on..my front fender is off, and because of that, the plastic handlebar two piece and the glove box lock suffer. the rear rack holds the two halves of the rear quarter panels rigid, and thus, gives the rear lite assembly a sturdy home...the rear rack also saves your lite assembly from cracking due to a rear end bump... i marvelled at how you removed the exhaust to paint it....mine had slight rust too...i gave it a matte black finish simply by spraying it with engine paint...while it was still on the bike..no overspray shadow with a shoe boxtop as splatter guard... the engine paint gives it the performance, powder coat look, without being affected by the heat. I don't know about anyone else, but between the dmv and the insurance companies, i don't believe they know what i'm riding...the title states the model is zheijan, .and the insurance card says its electric.. the word zheijan or whatever, that appears as the model, is the town the xingyue factory is in, in china; the insurance company doesn't register my 150cc as a scoot under the VIN, and made up a category of electric scooter to grant me papers...  ? The dmv has the correct VIN, but an ambiguous classification.....i'm riding what is neither a scooter, or a motorcycle, or a moped. those are all excellent mods and a wealth of info....i wish you all the best with your xingyue |
|
|
|
Post by Bluefront on May 30, 2010 6:20:26 GMT -5
Thanks for that.....the other threads on this model were useful, but I thought I could add to the knowledge base for this scoot with a new thread, and a different approach.
I finally got to ride this scooter in real darkness.....went for a ride at 3:30 AM. The DC lighting mods I did to this Xingyue work great. The thing lights up like a Christmas tree without starting the engine.....and is quite visible from every angle.
The headlight is another matter. Around town in an urban setting, driving below 40mph, and without the danger of deer and other animals......this scooter has a fair headlight (at best). At higher speeds, and away from the city lights, this scooter has a poor headlight. It's a Philipps 35w S2 bulb, running on the AC circuit. When you hit the high-beam flasher switch, the beam runs on DC......but the lighting is still poor.
Not sure if I'm going to do anything about this. I think the circuit is capable of running a 55w headlight, but I'm not sure if the lens would stand the extra heat. There are other alternatives I'll explore......but I think the easiest/cheapest route would be an add-on driving light. I could wire it into the unused headlight switch, through a relay. It could mount right above the fender by the shocks....if the light were thin enough. I might have the right light someplace around here, along with everything else necessary......stay tuned.
|
|
|
|
Post by emanyoda on May 30, 2010 10:36:57 GMT -5
Changing the head light bulb to 55w is a bad idea, I've read on prior posts about this bike, people doing that and yellowing and even distorting the cheap plastic lens. I believe a secondary light source is the only way to go, thats what made me go with the fog lights.
|
|
|
|
Post by Bluefront on May 30, 2010 14:32:08 GMT -5
FWIW.....here's the secondary air filter mentioned in some manuals. It's actually a foam filter for the air being sucked into the CVT housing. Mine was very clean after 1100 miles, so I removed it, and just replaced the housing. This should allow better airflow for the belt.... 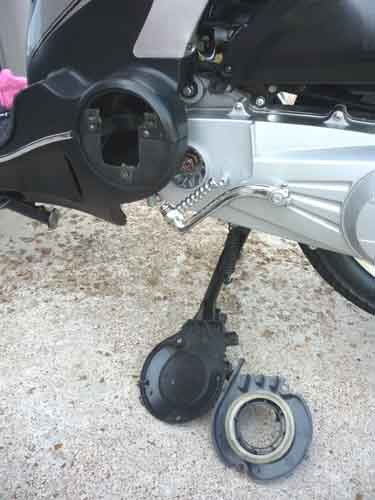 |
|
|
|
Post by Bluefront on May 30, 2010 14:36:12 GMT -5
Here's a possible problem area.....it's the rear disk brake line. At the point of the arrow, the rubber hose was rubbing a frame edge. I bent inward the little holder bracket till the line had clearance. As the suspension works this line moves up/down......and shouldn't be rubbing anything. 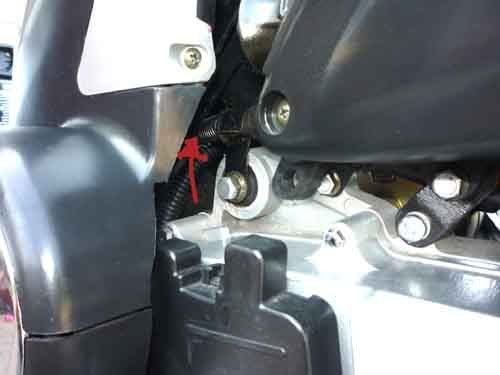 |
|
|
|
Post by Bluefront on May 30, 2010 14:39:42 GMT -5
Want to adjust the mixture screw.....it's easy with the right tool (the seat bucket still must be removed). I cut down an extra stubby screwdriver using a bench grinder. Works pretty good.... 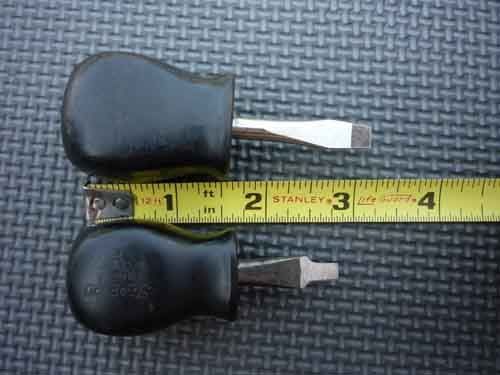 |
|
|
|
Post by riceburner on May 30, 2010 14:48:43 GMT -5
FWIW.....here's the secondary air filter mentioned in some manuals. It's actually a foam filter for the air being sucked into the CVT housing. Mine was very clean after 1100 miles, so I removed it, and just replaced the housing. This should allow better airflow for the belt....  I did the same thing. My foam filter was clean after 1400 miles so I left the filter and housing off. More ventilation makes for a happy bike. Also drilled the same size hole at the clutch end. |
|
|
|
Post by Bluefront on May 30, 2010 14:50:21 GMT -5
In some other threads, owners of this model talk about the air cleaner housing getting a bunch of oil from the crankcase breather hose. Here's my attempt to reduce the oil sucked in. It's a valve cover breather filter from Auto Zone, with a "T" fitting attached. The large amount of blow-by gasses will exit through the filter. A smaller amount will still be sucked in by the carb through the filter housing (the OEM fitting). I drove the scoot about 75 miles today.....the new, experimental breather system appears to be working OK. No oil in the air cleaner housing, and nothing visible on the new breather filter. Hope it works. 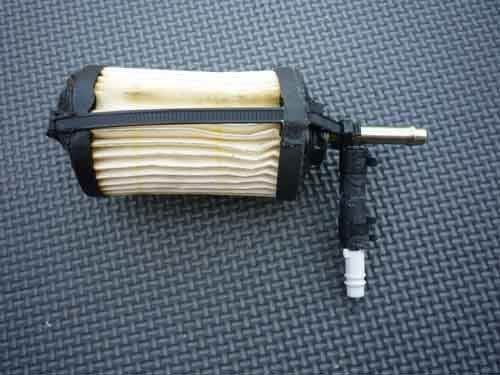 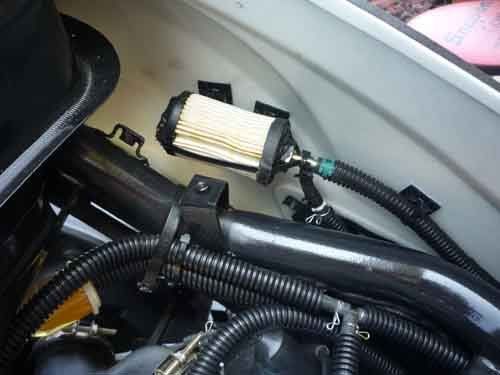 Edit....still working after about 300 miles. The critical thing here during installation.....the line to the breather filter runs upward from the valve cover port. Any oil blown into the line will drain back into the engine after the engine is stopped. This should result in much less oil loss than the stock setup. That's the theory anyway. |
|
|
|
Post by gross392 on May 31, 2010 22:37:14 GMT -5
Sooo one of my shocks came on the hardest setting and the other was about halfway. Since i couldnt get the one off hard i moved them both to hard and now i quickly realized its not that great unless you have two people on the unit. Whats the trick to be able to soften them up? I cant seem to get the springs compressed at all to get it to a softer setting
|
|
|
|
Post by Bluefront on May 31, 2010 23:25:08 GMT -5
No trick at all, and you don't have to compress the spring. The adjustment cam should turn relatively easily on the shock body using a spanner like shown above......or something like a big channel lock wrench. The clearance on the air cleaner side is very limited however. It could be your setup is rusted tight on the side that won't move.....soak the cam section in rust-buster or WD40. FWIW....I weigh 230 and have my shocks in the middle of the five settings. Haven't tried riding double yet.  |
|
|
|
Post by cruiser66 on May 31, 2010 23:43:02 GMT -5
|
|
|
|
Post by Bluefront on Jun 1, 2010 12:09:00 GMT -5
Mod of the day......an LED driving light from Auto Zone (I think). The other light from this set is on my Roketa. The light output is fair.....not nearly as bright as a normal 55w driving light, but added to the headlight output, should be a big improvement. I'll try to get a night shot later. It fits right above the fender, close to the steering stem. This makes it almost completely stealth.....undetectable unless you're almost lying on the ground. Right now it comes on with the ignition (very low current draw). I may wire it through the unused switch on the handlebar, so I could turn it off in the daytime.....but it makes a nice front running light right now. I had to make two DIY brackets, since the bracket it comes with is made to mount on a flat surface. The fender is dished out at that spot. No problems so far......  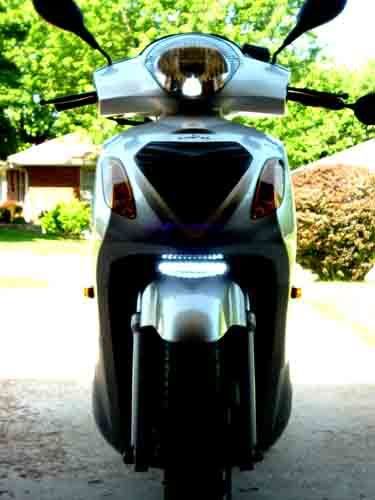 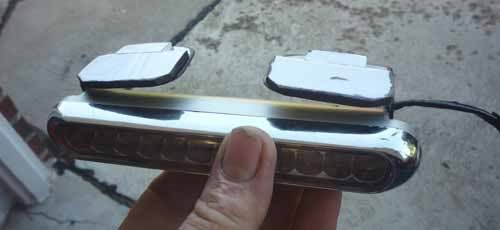 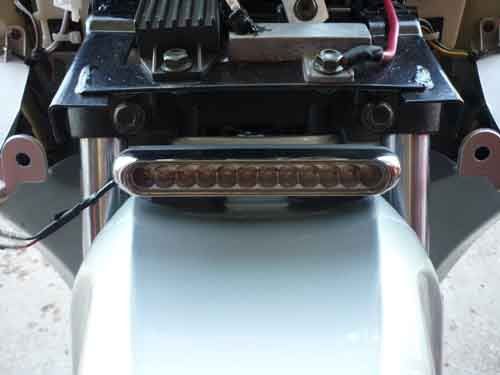 Happy modding..... |
|
|
|
Post by Bluefront on Jun 1, 2010 18:40:38 GMT -5
Till now I haven't messed with the carb, other than lowering the idle speed to about 2K (on the tach). I've never run WOT, and have been taking it very easy, breaking it in. It's got about 1300 miles on it now.....and I'll be driving faster.
Here's my take on the carburetor settings... adjusting the mixture screw has very little effect. To me this indicates the pilot jet is too small. The idle is not as smooth as it should be.....to get a stable idle, I have to go up to about 2200rpms. That's too fast for me.
Under moderate throttle openings on acceleration (nothing over 1/2 throttle), there is definite detonation audible. I checked the needle position and it had only one richer setting left. So now the needle clip is all the way down. And that seems to have mostly cleared up the detonation, but not all of it.
I don't know what's in there now (stock), but I'm going to order a few jets.....maybe a #38 and #40 pilot, and maybe several main jets like #105, #110, #115. (my guess would be a #120 is too rich for the stock air filter and exhaust).
This scoot runs good at higher speeds, like up to 60mph, which it does easily. I do need to get the low speed operation a little better.....stay tuned.
|
|
|
|
Post by riceburner on Jun 1, 2010 22:09:26 GMT -5
Blue...the stock jets in my ITA 150 were 35 pilot, 102 main. With the 35 pilot the scoot would barely idle.
FWIW...I rejetted to 40 pilot and 120 main.
Scoot has a rock solid idle now.
The 120 main has produced no driving problems at all at any speed.
Still using stock air filter and exhaust.
|
|
|
|
Post by Bluefront on Jun 2, 2010 16:22:53 GMT -5
It'll be a little while for the jetting thing....got a few things to order.  Next mod.....fan cooling for the engine compartment. Lots of others have done this, including myself with my Roketa. If you ride in hot temperatures around town (slowly), this mod will be a big help. This one is a 92x36mm server fan. Right now it's wired to come on with the ignition, using an automotive relay, through a 5A fuse.....later I'll hook up a switch to turn it off in the winter. The fan ends up about 1 1/2" from the valve cover.....it will help cool the engine somewhat, but the main benefit will be to keep the carb and everything else in the engine compartment closer to ambient temperature. You can hear the fan with the engine idling.....but driving along with a helmet on makes it inaudible. Useful mod.... 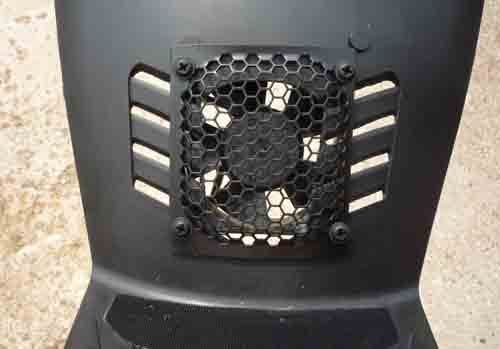 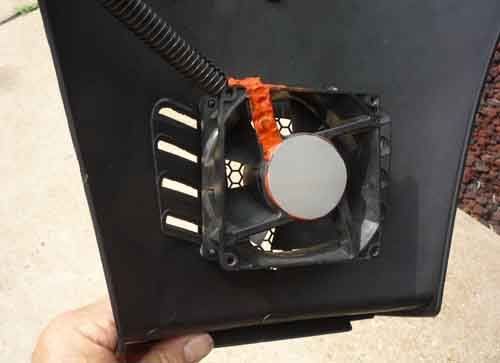 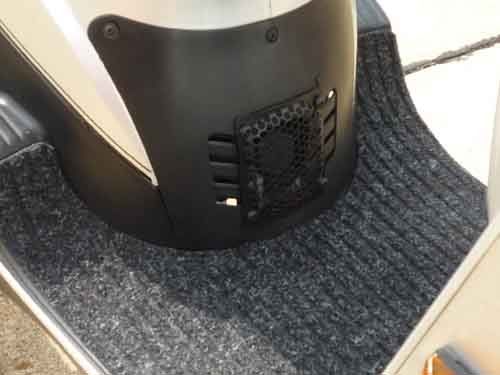 |
|
|
|
Post by gross392 on Jun 4, 2010 0:05:06 GMT -5
Have you guys found any sort of restrictions in your variator or anything? I have a Tank tr 16, but it's also called a xingue on the title so I assume they are interchangeable names. I have replaced the CDI with any unlimited one but i'm still hovering around 6k rpm's even on straight aways with ample room.
|
|
|
|
Post by Bluefront on Jun 4, 2010 6:26:27 GMT -5
Hummm...that does look to be the same scoot (Googled it). I never saw one before.
It's possible the variator and everything else is the same as an ITA 150.....but there may be small differences. Mine also seems to stay around 6K most of the time while moving. But I've never tried any WOT runs yet (still breaking it in). I have had it up to 55mph or so, and had some throttle left.....that was about 6K rpms. My red-line on the tach is 10K (?). Can't say I want to try that out however.....
|
|
|
|
Post by riceburner on Jun 4, 2010 9:12:55 GMT -5
Gross...just like you and Bluefront my scoot hangs around 6K when I'm pushing it.
I've only seen variator restrictors on 50cc scoots.
BTW...I just received 10g sliders from Scrappy. I'm gonna keep the stock variator.
|
|
|
|
Post by Bluefront on Jun 4, 2010 14:50:52 GMT -5
Heh......every so often a person lucks out. I found a guy on the local CL advertising a misc pile of cycle stuff. Since he was close to me I went over there this morning......picked up a brand new 24mm Honda carb off a 125cc he said. Turns out it is a Keihein (?), that looks exactly like the Xingyue carb.
Pulled it apart and it has a 104 main jet and a 34 pilot, so I still need bigger jets for my own carb. But at least now I have a new carb for a spare. Gotta love Craig's List....... ;D
Cost me $20
|
|
|
|
Post by gross392 on Jun 4, 2010 23:35:38 GMT -5
Have any of you guys seen a windshield made for this model? I got a windshield that came with mine but it;s pretty jankitty. I have tried setting it up multiple different way with threadlock and it still will start to fold down when I hit a few bumps going 40+ MPH. I would like to find a nice windshield that fits this correctly. Doesn't matter if it's half or full shield just some protection from the wind.
|
|
|
|
Post by Bluefront on Jun 6, 2010 8:54:51 GMT -5
I've never seen one with a windshield.....post some pictures of yours and the problem. On with the bling.....found some nice vinyl 1/2" letters at Hobby Lobby ($4). They are available in a bunch of different colors. The adhesive back works great, and the vinyl will apply to curved surfaces. I like these much better than the bigger chrome letters from Auto Zone. The word "Xingyue" is 3 1/2" long as shown. These are not flat letters, but "bubble" up slightly, giving a 3D look. Should last quite a while, much like the vinyl pin-stripe between the lettering. 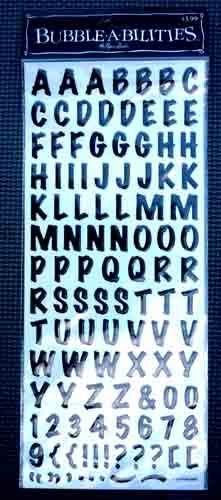 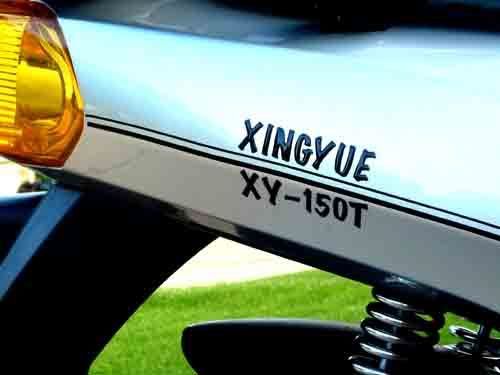 |
|
|
|
Post by Bluefront on Jun 8, 2010 10:16:19 GMT -5
Next mod on the list....a custom fitted 18" Reebok duffel bag from Target ($18). It's modified to fit using some buckles/straps from Walmart. It will fit better with the standard trunk, but could also be mounted in a similar manner w/o the trunk. This whole thing comes off/on in seconds using no bungees and no new holes in the body or rack. 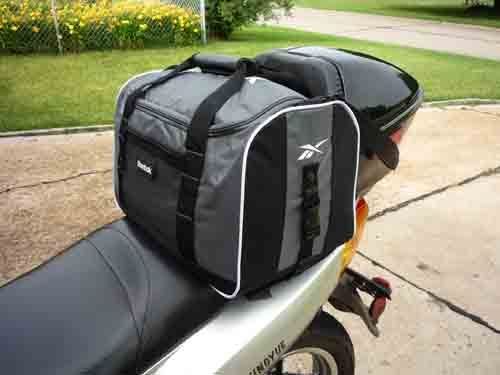 The custom fitted strap just sits under the seat.....when the seat snaps shut, the strap is held in place. 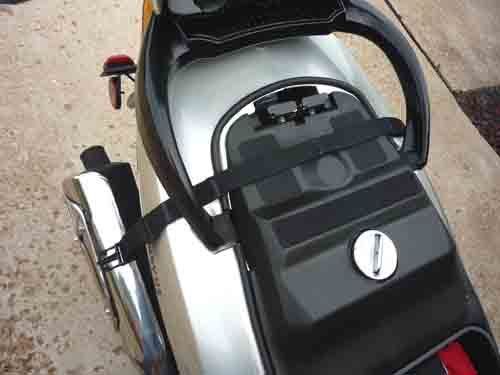 When mounted, the top of the case and the front compartment can be accessed without loosening anything. 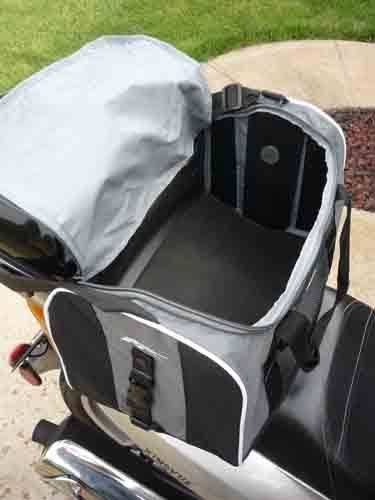 It can be carried easily w/o anything in it, or can be folded flat. 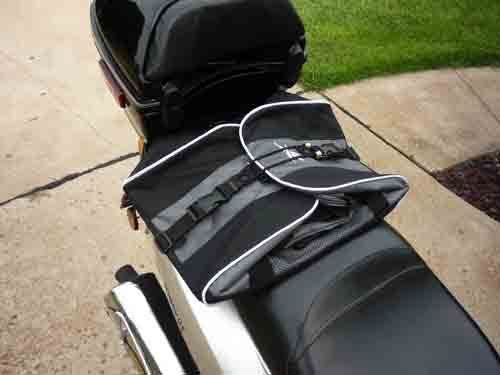 And if that wasn't enough, it will also fit on the floor-board sitting on it's side, held by the straps run through the helmet hook. 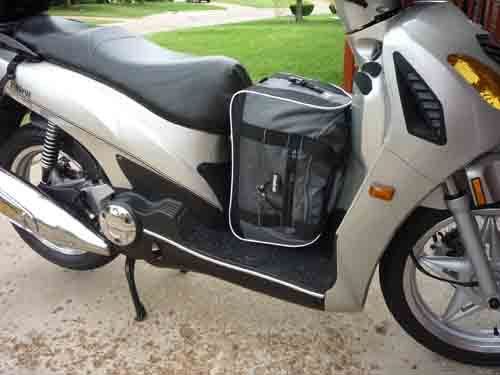 You wouldn't know it's back there riding along. It's not as sturdy as a leather saddle-bag rig.....but it mounts easier, is cheap, and will work fine for occasional use, shopping, picnics, etc. I can take other photos if anybody wants to duplicate the setup.....it was an easy mod. ;D |
|
|
|
Post by Bluefront on Jun 9, 2010 7:46:07 GMT -5
More carb stuff....a few posts back I talked about getting a Honda 125 carb, and that it looks the same as the Xingyue carb. Well no wonder.....turns out my Xingyue has a Keihin carb, virtually identical to the Honda carb. 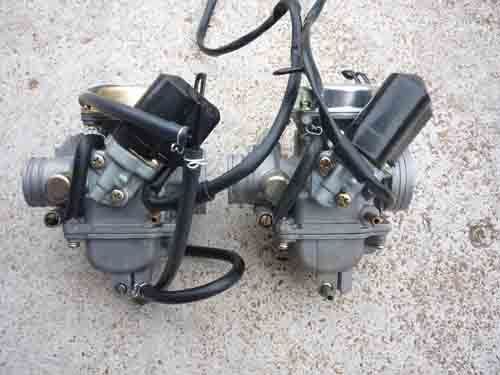 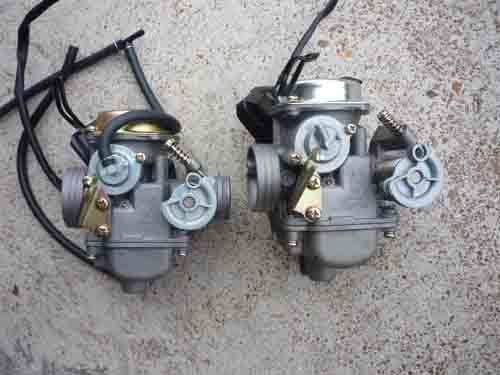 It fits perfectly.....the throttle cable is perfect, and the plug for the choke is the same. The main difference....the Honda has a drain screw on the carb, rather on the end of the drain hose. The Honda carb model.....HH13JL19. The Xingyue model HG31JL53. After it stops raining, I'll try this out.....the Honda carb has a one size bigger main jet. Heads up on this.....these carbs have no accelerator pump. There is no clearance between the float bowl and the frame for the standard acell pump setup. Here's an example of a 30mm performance carb from Scrappy that won't fit without a different manifold with a different angle (available?).  If there is a bigger carb known to fit....please post about it. |
|
|
|
Post by tortoise on Jun 9, 2010 17:33:58 GMT -5
I talked about getting a Honda 125 carb, and that it looks the same as the Xingyue carb. Well no wonder.....turns out my Xingyue has a Keihin carb, virtually identical to the Honda carb. Just curious . . are the slide-diaphragm assemblies interchangeable? |
|
|
|
Post by Bluefront on Jun 9, 2010 17:37:21 GMT -5
Follow-up on the carb swap.....uneventful. It performs about the same as the OEM carb. If there is any difference at all, I can't tell. But anyway.....now I can tell everybody I'm using an original Honda Keihin carb on my cheap Chinese scoot. Gotta make it faster....right?  |
|
|
|
Post by Bluefront on Jun 9, 2010 17:40:08 GMT -5
^^^^^I had them both apart to adjust the needle position, but didn't try to do a swap. I'd say yes however, since everything else is identical.
|
|
|
|
Post by Bluefront on Jun 9, 2010 17:58:23 GMT -5
Another FWIW......the valve cover gasket on this scoot is a P.O.S. When you tighten down the two cover bolts, there is no indication that you've got the cover tight enough......because of the gasket design.
Well I've had the cover off twice now for valve adjustments....after this last time, the cover started leaking. Checking it I found the rubber gasket split in two places. Well I don't have another gasket.....wouldn't trust it anyway. So.......I removed the gasket completely, cleaned everything up, and reinstalled the cover with hi-temp silicone filling the channel that the gasket was in. I let it dry 24 hours, and gave it a 30mile road test while I was doing the carb testing. No leaks......should be ok. Cars use this same method for the assembly of many engine/transmission pieces.
Be careful when you do a valve adjustment, and check for leaks after you do it.
|
|
|
|
Post by Bluefront on Jun 10, 2010 15:57:13 GMT -5
Hope you guys don't mind all these photos....they're only about 50k each, but they do take a while to load. The other threads seemed to have very few photos.....a photo makes everything easier to understand IMO. Here are a few carb views some of you may not have seen.... 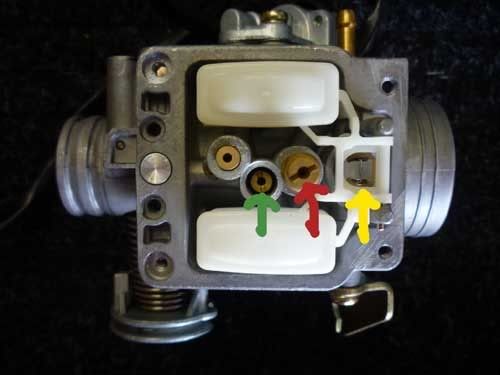 The red arrow is the main jet. The green is the pilot. The yellow arrow points to the adjustment tab for the float level. 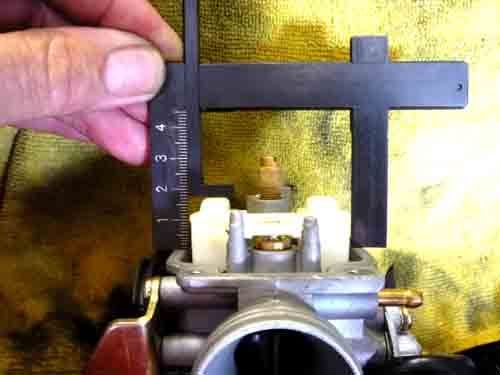 Here's where you take the measurement for the float level...this is critical. I'm using a genuine Honda/Keihin float adjustment gauge. But you can use a small rule. You turn the carb up-side-down to get this measurement. If it's off, you bend the tab up or down. I haven't found the correct measurement yet.....it's showing about 18mm here. Edit.....I've found specs on this carb that say 17.5mm and some that say 18.5mm. So I guess 18mm should be ok...... 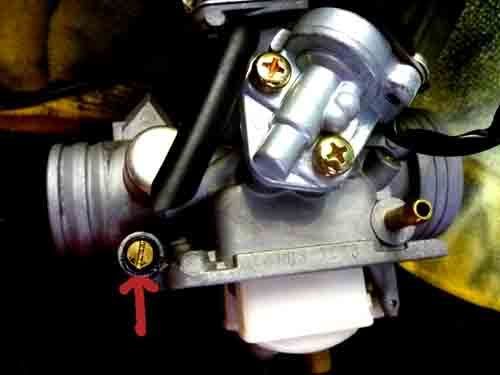 That's the mixture screw....and difficult to spot when the carb is installed. 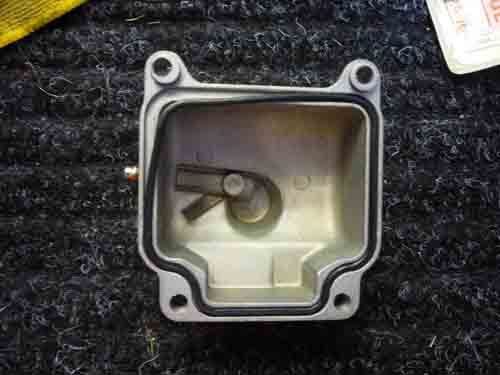 That's a problem you might have when taking the float bowl off.....the gasket either shrinks or expands. If it expands, you can shrink it with a hair-drier...carefully. If it shrinks like the photo, you can expand it by carefully stretching, or by soaking in carb cleaner for a short while. To reinstall you can use a few small drops of super-glue at the bottom of the channel, to hold it in place while you put the bowl back on.... These are photos of the Xingyue carb, a genuine Keihin. The jet sizes are stamped on the jets (unlike both my 50s with Chinese carbs). If anybody wants any other photos of this thing just ask.....I've got this extra one now. ;D |
|