|
|
Post by riceburner on May 20, 2010 18:37:37 GMT -5
I've been thinking #38 pilot. and #115 main,and also removing the screen behind the air filter (less restriction). Where did you get the jets? Blue...I got the jets from Jetsrus.com. Fast response time from the company and everything received as ordered. They don't have a XingYue 150 listed. The jets are under Honda GY6 150. I ordered the cheaper "OEM Style" jets instead of the more expensive genuine Keihin jets. Save your money and order the OEM Style jets. They work great. Pilot jets are $5.59 Main jets are $2.89 As far as gas mileage goes...I don't care. I want a strong running machine that's fun to ride.  |
|
|
|
Post by riceburner on May 20, 2010 18:47:24 GMT -5
What kind of gear oil are you guys using? The manual I have says 15w 40 but I don't believe it for a second. My old 50cc used 80w 90... I'm using gear oil sold in motorcycle shops called HP Trans Oil, SAE 80W/85W. Comes in a red bottle and has a small Honda logo on it. |
|
|
|
Post by emanyoda on May 20, 2010 18:55:14 GMT -5
15w 40 is actually for diesel applications, people say they use it but I'm not entirely convinced that its good for the scoot.....I use Valvoline 10w 40 (Bluefront) I like the look of your license plate holder setup, thats a great idea! I went with the old school vertical look. The two black bolts on the top actually project light down on the plate  |
|
|
|
Post by emanyoda on May 20, 2010 19:03:33 GMT -5
(riceburner) I'm with you on that one.....It's been over a year since I swapped jets but I believe I used the same sizes you did and I even got them from the same manufacturer. Mine is runnin strong as well. Not sure about the gas mileage either, I keep forgetting to keep track of it, when I fill up
|
|
|
|
Post by riceburner on May 20, 2010 21:18:18 GMT -5
Eman...yeah the jet modifications are the cheapest "bang for your buck" performance upgrade out there.
|
|
|
|
Post by Bluefront on May 21, 2010 6:35:51 GMT -5
I've almost finished my DC conversion on this scoot......what a difference. The scoot is now visible without the engine running, both to the rider and everyone else. Here's what is visible with the ignition on, before you start the engine.....The two dash-board illumination bulbs, the front running light (under the headlight), the two added-on front side clearance lights, and the two new tail lights by the license plate. 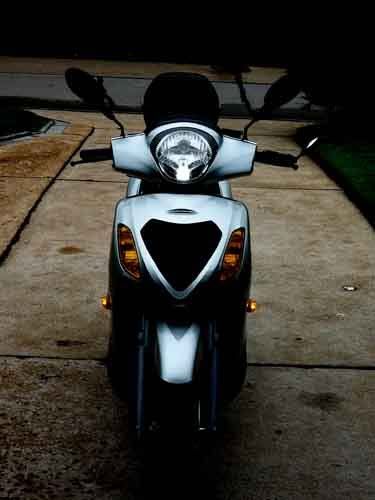 Except for the dashboard bulbs, everything converted is now LED. The added current draw to the DC circuit is maybe 5W (very little). From a safety standpoint, this is a worth-while mod. And from a convenience standpoint....outstanding. When I turn on the ignition now, I know the thing is actually ready to start. This mod only required some easy wiring mods......nothing involving the stator. I'll post the wiring changes along with the wire colors shortly, in case anyone wants to do this. Well worth the time....... ;D |
|
|
|
Post by Bluefront on May 21, 2010 18:28:29 GMT -5
Here's a view with the headlight housing removed..... 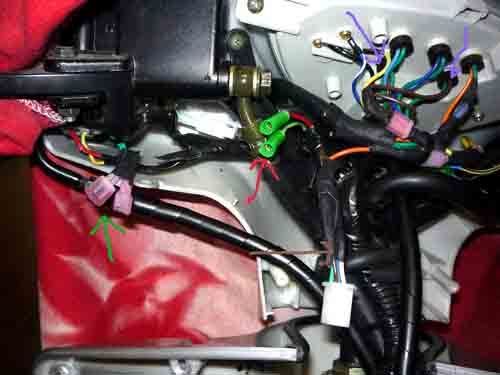 The red arrow points to two wires that were hanging loose, apparently unused. The red wire is 12v all the time, the other wire is dead. The green arrow points to wires from the unused light switch. I cut the two wires loose from the harness.....they can be used for something like a fog light. It's a simple on/off switch now. The brown arrow points to the headlight connector. The brown wire goes to the front running light. I cut it loose from the harness, and connected it to a switched 12v DC source. The purple arrows point to the instrument illumination lights......I cut the brown wires loose from the harness, and attached them to the same 12v DC source. Next photo.....the source for the 12V DC. 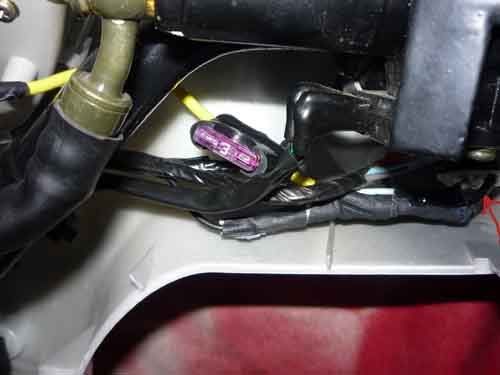 The red arrow points to the horn button.....the black wire is a switched 12V DC source. This will turn on the extra LED lights when the ignition is turned on (motor doesn't have to be running). Notice the fuse holder....I wired in this 3A fuse for all the extra LEDs. This fuse would blow before the main 15A fuse that powers the black wire. You need a low-amp fuse for this application. There it is.....it's a necessary safety mod IMO. I also finished up my carpeted floor mat.....an indoor/outdoor floor mat from Walmart, held on with Velcro. 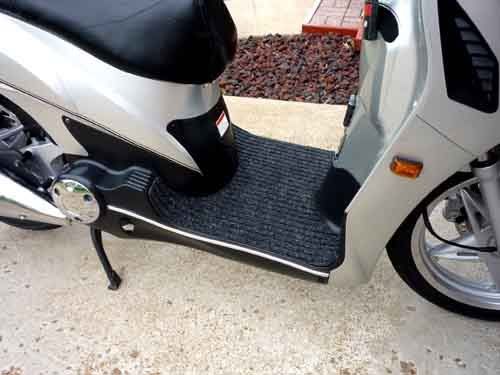 Happy modding.  |
|
|
|
Post by riceburner on May 21, 2010 19:57:42 GMT -5
Question for you other ITA 150 owners....
How accurate or should I say "stable" is your fuel guage?
My fuel guage is pretty much a joke. The needle bounces all over the place. When I fill the tank up the guage does not report a full tank. When I'm riding it will report many different fuel levels.
Is there a reasonably easy fix or should I just live with it?
|
|
|
|
Post by gross392 on May 21, 2010 21:37:39 GMT -5
Don't you think the carpet will get mildew-ey or moldy if it go wet?
|
|
|
|
Post by Bluefront on May 22, 2010 4:48:34 GMT -5
^^^^^My fuel gauge is very stable, and reasonably accurate. When my needle hits the red (empty), I can put about 1.5gal in the tank. That gives a reserve of about 1/2 gal.....don't push your luck. If the needle is unstable.....check the little screws on the bottom of the instrument panel. Mine were slightly loose. The sender could be a problem.....the little contact arm that swings with the float, might need to be tightened. (not sure if this is possible, but it is on other units). Carpet.....it's an indoor/outdoor carpet, and designed to get wet. It's 100% synthetic. The bottom is a sealed surface that doesn't let water through, and the Velcro pads stick to it well. Besides.....it only cost about $4.  |
|
|
|
Post by emanyoda on May 22, 2010 12:30:29 GMT -5
Mine works great. But I've learned when it comes to the fuel gauge not working, if you fill it up to the neck of the gas tank (super full) it won't register until the level goes down a little bit. Bummed me out when I first got my ITA and filled it up, I thought it was broken!!!
|
|
|
|
Post by riceburner on May 22, 2010 18:54:06 GMT -5
Found the problem with my fuel guage. I pulled the fuel sending unit out of the gas tank (very easy to do) and found the float was binding and not moving freely. All I had to do was grab the little retaining clip that holds the float where it pivots with needle nose pliers and give the float a little more play. BINGO......all is well.   |
|
|
|
Post by gross392 on May 23, 2010 21:21:47 GMT -5
My scooter ( under 50 miles on it) when it's on the center stand and I spin the front or rear wheel I can hear the break slightly rubbing on the calipers. Is this normal for a new scooter? it's nothnig major but i can definitely hear it rubbing. It doesn't seem to have any effect while riding and I can't hear it because of other noises overriding it i'm sure.
|
|
|
|
Post by riceburner on May 23, 2010 21:32:37 GMT -5
Brake pads lightly touching the rotors is not a problem while the wheels are spun with the scooter on it's stand. Air flow generated during riding keeps the pads off the rotors.
|
|
|
|
Post by Bluefront on May 24, 2010 6:43:29 GMT -5
Brake issues.....when I first got my scoot the front brake made scratching noises under heavy usage. Almost sounded like metal on metal, although the disk looked perfect. I removed the front pads (easy), and sanded them down. Laid a 120 grit piece of sandpaper on a flat surface, and held the pad for sanding. I also put a small champer on all the edges....fixed the noises. But.....I do have an issue with the rear pads. They are extremely dusty under normal usage. The rear wheel gets dirty within 100 miles. I wonder does anybody know of a place selling pads for scooters with a brand name on the pads themselves. I'm looking for pads that aren't so dusty. In the automotive field you can find all sorts of pads, some claiming to be low dust, some ceramic, etc. I'd trade a little stopping ability for a slightly harder/less-dusty pad.  |
|
|
|
Post by JR on May 24, 2010 7:09:24 GMT -5
Sanding pads is a mistake, no way to keep them even and accurate to the drum or disc and they will just make more powder seating themselve back to the metal surface. Want to get them to seat well and clean themselves up? Use this;  Yep Roach powder, it's 99% boric acid and it will make the shoes on a drum brake and pads on a disc brake settle down to a perfect flat surface and no squeaks, and maximum braking power. Just sprinkle a little between the pads and the metal and let it do it's job, works great on clutch pads too! And the added benefit, your coach will have no ROACH!! JRR  |
|
|
|
Post by Bluefront on May 24, 2010 9:38:22 GMT -5
Arrrg....maybe that's how they do it out in the sticks, but I've never seen any ASE mechanic (myself included) using that crap on brake pads or shoes.
You set a piece of sandpaper on a totally flat surface like a pane of glass for instance, then use some elbow grease. It only takes a few seconds, and any embedded crap or glazing is completely removed, rather than be ground back into the friction surface.
Some cheap pads make squeaking noises no matter what you use to clean them with. In such cases there are different types of anti-squeak fluid you use on the pads. That works for a while, but the best bet is to use good pads to begin with.
But where do you get "good" scooter pads?
|
|
|
|
Post by emanyoda on May 24, 2010 10:45:15 GMT -5
LOL!!!
|
|
|
|
Post by JR on May 24, 2010 10:47:04 GMT -5
LOL!! "good pads" maybe the chinese make a better pad, don't know but since all of them including name brand are made in China all I can say is good luck!
Now on that peferctly flat glass sanding surface I'm real curious as to how well the naked eye can match a curved brake drum pad like on some of these scooters up perfectly to the drum, same thing on a clutchand in my old early days of life I worked as a mechanic in a truck manufacturing plant. Worked in the repair shop and they kept containers of boric acid on the shelf just for what I described, that's where I learned the trick and one time we ran out and just went to the Dollar store and bought the same thing in the Roach powder!
Now mind you this was them big old 18 wheelers loaded down that was trusting this product to work after all ya need all the braking power you can get with one of them things and last time I checked there were several of them on the road not just in the sticks! LOL
Also let you in on another little secret there have been others here recommend it for loud noisy clutches it works like a charm allows the pad and the metal surface to work together to a perfect fit. BTW acid, pad and metal does not = glaze. LOL At first you'll get a little extra dust but it'll soon blow away and all will be well.
Just another helpful hint from the old Arkie in the sticks! JRR
|
|
|
|
Post by riceburner on May 24, 2010 18:54:10 GMT -5
Have any of you guys installed a manual petcock on your ITA 150 yet?
If so, where can I get one?
I tried searching around and no luck yet.
|
|
|
|
Post by robb on May 24, 2010 19:15:43 GMT -5
About pads ; where i live there are some brake and clutch rebuilders and they will do pads or clutches with any linings that they have . I just tell them what I want and they do it while i wait . Usually cheaper than any parts store too . Carbon metallic or full metallic , ceramic ; anything you want . Maybe you can find a place like that near you . Robb
|
|
|
|
Post by Bluefront on May 24, 2010 20:42:13 GMT -5
^^^That brake pad idea sounds interesting, and something I never considered. Now to locate a place around here that can do such an operation.  Here's a GY6 fuel valve kit that converts the fuel-tank valve to an external valve. It's expensive, but sounds like a very good upgrade to this scoot.Adding an external manual shut-off would also be a good idea...... |
|
|
|
Post by Bluefront on May 26, 2010 18:10:36 GMT -5
|
|
|
|
Post by emanyoda on May 27, 2010 10:22:20 GMT -5
No performance exhaust??
|
|
|
|
Post by emanyoda on May 27, 2010 10:24:40 GMT -5
The other day I was trying to change my avatar to a different pic and now I can't figure out how to do it. Does anyone know the secret? Step by step?
|
|
|
|
Post by Bluefront on May 27, 2010 12:50:54 GMT -5
Heh....first I don't think I've seen a scooter of this body style with a "performance" exhaust. The posts on this subject say the after-market exhausts don't fit this scoot very well. Besides.....I consider this a brand-new scooter, with about 1K on it. Nothing is wrong with the OEM exhaust IMO....even looks good. Just needed a paint job. Avatar....go to profile at the top of the page, hit modify profile, than put in the location of your new avatar in the correct box. It's easy. What wasn't easy.....re-attaching the muffler. The bottom 10mm bolt (the one with the tap showing in the picture above), was stripped out too much. It wouldn't tighten. Fortunately....there's enough clear space behind the hole, that if you get a longer bolt (about 1" longer), you can put a nut on the bolt, and it will hold just fine. The new paint job looks great, and was worth all the trouble. I hope that paint lasts.....  |
|
|
|
Post by Bluefront on May 27, 2010 15:42:12 GMT -5
Harbor Freight has a 5-day sale starting today......among some stuff I bought was a set of chrome horns ($8). I used the lo-tone horn. It fits perfectly with no mods.....the wire connections are even correct. Just bolt it down. I didn't need to use the included relay.....the Xingyue has a 15A fuse, and the wiring is sufficient. This horn is 3x as loud as the cheap OEM horn.....and a good safety mod. Go for it....  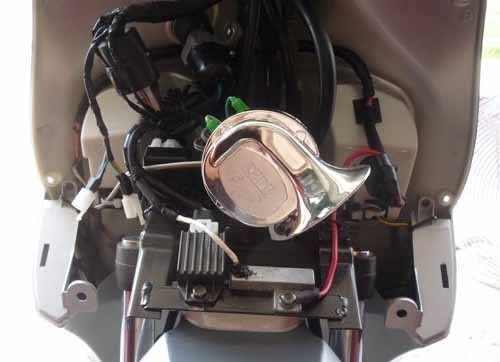 |
|
|
|
Post by riceburner on May 27, 2010 18:43:17 GMT -5
Thought I show you what I have been up to lately. Removed that big, ignorant rear fender the ITA 150 comes with. I can't stand it. The scoot looks so much cooler without that fender IMO. I also relocated the license tag right below the stop light. I used the stock tag bracket and stock tag light. I just had to make a small bracket that mounts the tag bracket to a bolt previously used by the fender. Sorry about the license blanking. I don't need any bad guys cross-referencing my tag and going scooter shopping. ;D   |
|
|
|
Post by Bluefront on May 28, 2010 6:49:35 GMT -5
^^^^^Looks nice with that fender removed......but I'll bet you'll regret it if you ever have to ride in heavy rain.  |
|
|
|
Post by emanyoda on May 28, 2010 8:31:57 GMT -5
I don't know what the hell is happening with my avatar but thats exactly what I've been doing and it's still not working, do I have to put the size 100x100 pixels in the correct boxes, because I've been doing that as well. I should have left it alone!!
Then carbon fiber exhaust that I put on my scoot has almost 2x the hole diameter of the stock exhaust. Don't you think that would help with flow restriction?
|
|