|
|
Post by ltdhpp on Feb 6, 2012 21:50:55 GMT -5
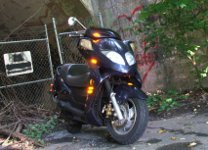
This could be the dawn of a whole new love affair. At first I thought "ah crap, its a BIG one" since I was hoping for a 150-on-a-big-50-frame sized scooter, but I think I can deal with it. I'm not sure how the sizing works, but this thing about filled up my long bed! It felt so nice on the road even with probably-low tires I had to have it. It runs dang good for something that's been a yard toy for a few years, I got it up to 45 on the test ride and it still felt like it had more to go. I figure neglect couldn't have hurt it too bad at only 2,000 miles. Best of all, I FIT on it. By this weekend it should have tags, insurance, a battery, a working cold enrichment valve, and a few new switches. For the switches I thank Scrappy to the tune of $5 each. The brake light was stuck on, the start switch broke in transport (damn straps) and a couple are ready to fall out. Then I can take it to my work to clean out those jets, have a look in the CVT, do the PDI that probably never got done, and circumcise that muffler. The outlet is the same size as the one on the 50cc was...  Pinky size. If all is well, on with the new mirrors & windshield, NCY CVT kit, Kevlar belt, extra LED lighting and other goodies. I also love the fact that this thing has 'city' lights inside the headlight housings. LEDs please thanks. It was almost the end of the riding season by the time I got the 50cc to where I was halfway satisfied with it... not this time. Attachments:
|
|
|
|
Post by mainepeace on Feb 6, 2012 22:21:55 GMT -5
A 150 should hit 50~55 at the top end. It will do 45 all day long. You definitely want a longer frame when going faster. You should be glad for the larger tires as well.
Glad you got one that fit you and you're happy with it!
Greg
|
|
|
|
Post by ltdhpp on Feb 6, 2012 22:41:54 GMT -5
Thanks!
My only complaint so far is that I can no longer do a quick 3-point turnaround on the front patio, lol. If I move the bin over I think I could make it a 5-point turn now that I took off the trunk!
|
|
|
|
Post by mainepeace on Feb 7, 2012 21:06:46 GMT -5
If you're strong you can grab the luggage rack and tug the rear wheel, making it a 1 point turn! LOL! I don't recommend doing it very often as it does weaken the rack.
Greg
|
|
|
|
Post by ltdhpp on Feb 12, 2012 13:31:57 GMT -5
Lol, I'll give it a shot. I could just about pick up the whole 50cc and spin it around, but this sucker is 300 pounds, I don't wanna pull my back! Yesterday I got the tags & insurance, found a battery that fit almost-perfect, and got the switches installed. The cheap Chinese brake switch doesn't work right. When it's fully inserted in its home, it doesn't move enough to close the switch. I just have it pulled out slightly for now but I doubt it will stay in place since its no longer snapped in place I cruised it around the block a little, and discovered the turn signals quit! The audible "bing" is now a dull "buzzzzz" and the indicators just stay lit and flicker a little. Hopefully that's just the flasher, and hopefully I can rig an automotive one to work. 0-20mph blows the 50cc away, then it feels like the acceleration drops off, but Im still getting to speed quicker than the 50cc. Without going too far I run out of road before I can check top speed, but I want to get it to the shop before anything else for that check over. I haven't even checked the air filter because the box is half covered up by the lower portion of the body, and I don't feel like laying on my back on cold concrete while I curse at the few screws I can't even see. That piece of body might go bye-bye... Speaking of laying on the cold concrete... I went to tighten up the exhaust manifold bolts... I heard a little leak... I got the first one to snug up a little, "great!" I thought to myself. I couldn't find the other one fishing around with the socket, so I felt around and only felt a stud. "No problem, I got nuts"... So I cram my face under the bike to have a look, and in horror I find some terrible rig of a nut/bolt\washers that I can only guess is pinching the manifold to the head somehow.  |
|
|
|
Post by justbuggin on Feb 12, 2012 18:43:19 GMT -5
change the connectors at the battery they gave me hell i was havive the same problems with mine
|
|
|
|
Post by ltdhpp on Feb 16, 2012 19:19:23 GMT -5
I'll try that. I don't remember if I tried the signal on short ride #1 after I put in the battery, this was only #2 when I discovered they didnt work. I hope this doesn't relate to putting in a battery and possibly indicate something is fried I did check the charging, it goes to 13.5 revving on the stand. Cleaning up that frame ground is on the to-do list - I saw the thread where someone discovered a nice thick layer of paint on theirs... I have a whole box of PDI parts, exhaust studs, an intake boot, other misc and some jets to play with. As long as I don't find a broken off stud or a stripped hole this should be a good weekend. |
|
|
|
Post by ltdhpp on Feb 19, 2012 10:39:05 GMT -5
No broken stud! What I was looking at was still the stud, it was just very bent and had a nut & washer on it. I replaced both studs and nuts and also found some nice pinholes in the manifold weld. This is either some 3rd shift welding or this got broken and was welded back by an amateur (like me). I used a small drill bit to clean up a nice ring of fresh metal around each hole and globbed some more weld in. I "tried" to weld up some cracks around one mount (I don't think I made it worse). I also had to bend the pipe a bit here and there to get everything to line up for re-installation. I see now why one of the muffler bolts was out, but luckily was stashed in the storage area. Fingers-crossed that it will seal, I have a gasket in there so hopefully it will be fine. I went ahead and removed the whole rear of the body to give myself room, and to get familiar with it. This baby is definitely a lot more sturdy than the 50cc!! I checked the valves - the exhaust valve had NO clearance, the intake was less than my smallest feeler. I set them to .003" intake and .004" exhaust. Today its on with more PDI stuff, CVT inspection and engine & gear oil changes. Oh, and the blinkers work normally once again  Attachments:
|
|
|
|
Post by ltdhpp on Feb 25, 2012 11:05:11 GMT -5
Well.. last Sunday as we were accumulating 6 inches of snow, I replaced all the things that should have made it run better... New hoses, intake boot, plug, fuel filter, I put a 115 jet in the carb, raised the needle up all the way and some other things. It ran a little that night, not very well, but I figured I just needed to fiddle with the A/F and idle settings go I called it a night. The next morning it ran but Idled WAY high, I discovered a massive vacuum leak that was a result of a not-so bright idea of mine. After I fixed that, it didn't want to run at all, except off of carb spray. Its getting fuel and spark... buying a new carb was my saving grace on the 50cc so I ordered one, and now I wait. Scrappy sat on it for a couple days after I bought it Wednesday, so I won't get it today.... I must say taking the body off (the rear at least) is MUCH easier than the 50cc... this one is mostly fasteners with only a few slide-locks & overlaps. I haven't found any (yet) of those impossible fragile snap-lock unions that often break. I just wish you could remove the storage bucket without removing the entire rear body like you can in the 50cc... In this 150 you only get a small window thats easily accessible to get at the carb. Getting at that A/F screw is going to be a pain! Attachments:
|
|
|
|
Post by ltdhpp on Feb 27, 2012 22:56:25 GMT -5
It runs again! oh yes.
Once again I am saved by buying a new carb... lol.
I am very impressed with the few laps I did around the parking lot. The sensation of being pulled away by the 150cc is new to me... on the 50cc it mostly just felt like I was holding the scooter back...!
I still have some fine tuning and buttoning up to do, a few rattles to find and some muffler trim to try to polish. If the alarm is drawing the battery down I need to get rid of it, hopefully its just something I can unplug, not a nightmare like what you get into on cars.
While I was waiting for the carb I picked up some of the good yellow fuel line (Northern tool has it), a fat clear B&S fuel liter and some clamps that I feel safe with on a fuel line. I also used a little flexible bracket to fashion a fuel filter holder so it doesn't bounce around going down the road.
Once I get it road worthy... then comes the fun ;D
|
|
|
|
Post by ltdhpp on Feb 29, 2012 12:58:32 GMT -5
I went for a quick test ride last night after buttoning up a few more things... she runs good! She gets to 30mph QUICK and to 50 soon after. I can't wait to get everything proper so I can see what she can do. Here's a pic of my fuel filter rig - Attachments:
|
|
|
|
Post by ltdhpp on Feb 29, 2012 13:03:42 GMT -5
And a pic of the potential for electro-mojo. I don't know what I was thinking putting in only a 4 position buss strip, Im sure to add more than 3 accessories, so 6-position one will go in, and I might migrate it down into the well on the side there to get it more out of the way. I put a hole in the battery cover for the accessory wires to go through. Also note the slick A/F screwdriver holder, lol. I don't know where I got that screwdriver from, but its 100% perfect for that. Don't wanna loose it... Attachments:
|
|
|
|
Post by ltdhpp on Mar 3, 2012 20:25:33 GMT -5
Had some more fun today... I put her all back together, zip tied the crap out of anything dangling/flopping around, and installed a car horn from a Lincoln and a relay. This is pretty easy, you only have to run one wire out of the front guts area. Attachments:
|
|
|
|
Post by ltdhpp on Mar 3, 2012 20:28:09 GMT -5
Also inspected the CVT parts, everything looks good and I found 13 gram rollers. To pull the cover on this scooter you have to remove more body and the left side foot rail... but now you can get a better look at my fuel pump goodness Attachments:
|
|
|
|
Post by ltdhpp on Mar 3, 2012 20:30:37 GMT -5
And don't forget the 'white' LED bulbs in the city lights. This is just a small fraction of the LED madness to come...!  Attachments:
|
|
nate
Big Dawg
 vroom vroom party starter!
Posts: 23
|
Post by nate on Mar 7, 2012 21:51:36 GMT -5
cool project! how'd you do the led lights? i have one burnt out headlight, so i was thinking of upgrading while i'm in there if it's not a huge PITA....also, i see that we have the same body style....you said you found a windshield for it...where? i'd be curious if it would fit my tank racer...
|
|
|
|
Post by ltdhpp on Mar 7, 2012 22:07:17 GMT -5
My scooter has small 194 bulbs inside the headlamp housings in addition to the headlamps, I just replaced those with LED replacement bulbs. Waiting for them to arrive is the only hard part! I got the windshield from scrappy's, I don't think ours are exactly the same but he might have something for yours www.scrappydogscooters.com/CHASSIS_PARTS.htmlThere are so many clones that you have to guess a little bit, but if you can figure out what the most popular clone is you can find a lot more with google searches. I found a lot of body panels i need for mine that way (not that I'm about to buy any...) |
|
|
|
Post by ashevillian on Mar 23, 2012 22:50:43 GMT -5
love the idea of a car horn on the scooter.. makes me want to goto the junk yard and find one and install it. the scooter horn does nothing to alert grandma when she is swerving into my lane
could you please post pictures of how you wire the horn and your LEDs so people like me who are not as techni-guru as you are can have a better idea how to install these in our garage?
|
|
|
|
Post by ltdhpp on Mar 24, 2012 17:11:32 GMT -5
The horn is easy! Check out this link here: www.bcae1.com/Find the section on relays and all will be clear. You already have two wires ready to go from the old horn. These will plug right into the relay and work as the activation circuit for the relay now. Then run your own wire from the relay to the horn (ground the horn to the chassis) and feed the relay with a hot (fused) wire from the battery. |
|
|
|
Post by ltdhpp on Mar 24, 2012 17:22:59 GMT -5
I replaced the rear caliper recently, one of the slide bushings was missing... I should have done that first thing. Shame on me! The caliper I got from scrappy fit right on the original bracket. I think I still need to get some more air out, or the cylinder went a bit south while bleeding it... Im waiting till my friend can help fill while I pump madly with a Mity-vac. Also the front rotor feels like its warped... its not bad over 35mph, but slower than that it pulses so bad it makes the front end bob up and down.... Attachments:
|
|
|
|
Post by ltdhpp on Mar 27, 2012 19:02:30 GMT -5
I definitely have a warped front rotor... I got a good look at it spinning against the pads while I had the front fender off putting LEDs on it. I just hope it's not the case that the mounts on the wheel are not machined true! I found a replacement for 40-50 bucks... more than the caliper! oh well The rear brake seems to be improving on its own... more bleeding is still on the to-do list though. I have a whole other thread for the LED lighting progress here: scootdawg.proboards.com/index.cgi?board=general&action=display&thread=48192Attachments:
|
|
|
|
Post by ltdhpp on Apr 8, 2012 9:02:47 GMT -5
Yesterday I installed a racing CDI and orange coil/wire that I scored for $23 via eBay/slowboat. How could I resist?
The shiny blue heatsink fins make the CDI much bigger and does not fit the rubber bootie so you have to secure it yourself. Also the hole in the coil was just slightly smaller than the mounting bolt so I had to ream it out a bit. In the back of my head I want to say the original coil looks like better quality than the 'performance' one... needless to say it and the old CDI will live in the scooter boot now, just-in-case.
It feels like it runs about the same, maybe a tad quicker if anything, but definitely 'different' somehow. The exhaust sounds more crackly and poppy on deceleration... yes I'll be keeping an eye on that plug. I have a 115 and 125 jet I ordered in case I need them as I slap on goodies.
Should I run premium since this CDI boosts the timing? I know they say you should do that in cars.
On another note, the same piece of hardware on that new rear caliper worked its way loose again. Luckily this one can just be replaced with a nut (and lock washer this time)
I also got a tiny tach... but I couldn't find anywhere to give it a good permanent install. It looks like I'd have to rig up a mount for it with some flexible bracketry, so I went with the horribly shameful temporary Velcro install for now. It says I rarely get over 7K, which means I have room to expand!!!!!!! CVT kit here I come.
|
|
|
|
Post by ltdhpp on Apr 10, 2012 21:03:37 GMT -5
My replacement front rotor came in, I installed it today, and Huzzah! The front brakes don't make the front end bob up and down anymore. I was worried at first after installing it because it sounded like it still contacted the pads unevenly when I spun the wheel, but it must just be minor. Half the damn bolts holding the rotor on rounded out their hex-drives... and they weren't even that tight. Luckily a co-worker has a nice pair of reverse-teeth auto-grip pliers that got them out. Bolts + lock-washers went back in. I also adjusted out the slack in the brake levers, they feel much better in my hands now not wiggling around. Im still waiting on more red LED lights to come in... I guess its about time to get that CVT kit...  |
|
|
|
Post by ltdhpp on May 6, 2012 10:34:50 GMT -5
Well, the front rotor is starting to warp again... its not nearly as bad but I notice it. I hope this doesn't become a regular thing! But the good news is, Northern Tool finally got more of my LED lights in so I can finish up the tail and brake lights now. I also ordered that CVT kit, and a woo-woo intake tube/air filter I couldn't resist. As soon as I get the time.... |
|
|
|
Post by TomO on May 8, 2012 13:25:23 GMT -5
Nice progress on your scoot! I have the similar scoot to yours in "Tank" Urban touring 150cc trim. Mine is a 2006 model though but still the same body on it and I love it! It being a bigger frame makes for a smoother ride at 50+MPH.
Enjoy it for a long time!
|
|
|
|
Post by ltdhpp on May 10, 2012 20:15:44 GMT -5
Thanks! You don't also have a Crown Vic do you...? I just installed the NCY CVT kit! It comes with 10g rollers, 1K torque spring, and the 'blue' clutch & Teflon variator. I also installed a 842 Kevlar belt and used a Malossi torsion controller instead of the NCY spring seat. Results are great! My RPMs used to putz around 4K until I got to 40-45, but now they zip right up to around 6k and stay there. Acceleration much improved. Noticeable hill climbing improvement. It gets to 40-45 a little quicker but I haven't taken it on a larger road yet to check top speed. I'm waiting to make sure the 'new belt' smell goes away before I scoot out of the 'push it home' radius...! I'm mildly disappointed with the clutch... the pads are only a smidge larger than stock, and the spring rate difference is minor. The NCY clutch I put in the 50cc felt like at least 1.5K, and I liked being able to rev it a little at stop lights, lol. I might try to swap some springs out next time I take it apart. I'd do it asap except for the fact that you have to disassemble 1/3 of the body to get the dang cover off!!! Attachments:
|
|
|
|
Post by ltdhpp on May 12, 2012 9:21:21 GMT -5
Still no top speed check, but the belt smell is going away (lol) and the clutch feels like its 'tightened up' a tad... I can actually feel it disengage now at slow speeds a bit sooner than it used to. Its not so bad that it makes stop-and-go traffic a jerky mess but its making me think twice about tighter springs...! Its odd, the 50cc revved up more with its NCY clutch but I almost never felt it disengage. Also it feels like it engine-brakes less now, which I like, it did it too much before. Plus I hear hard engine braking is hard on everything else too! I wouldn't think this scooter was modified, but I can only guess maybe it already had a 1K spring and this NCY kit has a 1.5K. It could have broke the original one and got a aftermarket one, but I'd think the original owner would have mentioned that. She went on and on about the new carburetor but forgot to mention the missing battery, stuck brake light, warped rotor, bad rear caliper and missing exhaust hardware lol. Granted it had been a yard toy for a couple years... 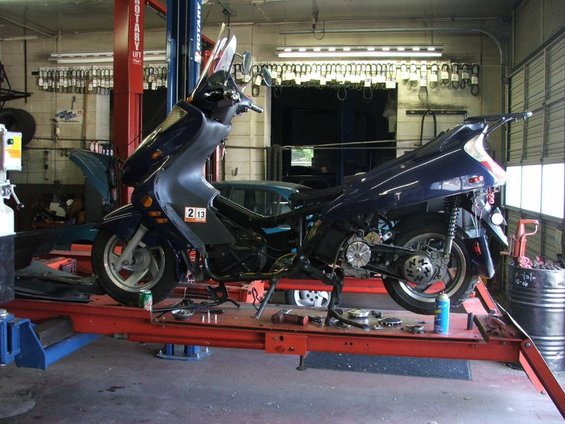 |
|
|
|
Post by nemesis98 on May 13, 2012 17:10:29 GMT -5
I also got a tiny tach... but I couldn't find anywhere to give it a good permanent install. It looks like I'd have to rig up a mount for it with some flexible bracketry, so I went with the horribly shameful temporary Velcro install for now. It says I rarely get over 7K, which means I have room to expand!!!!!!! CVT kit here I come. Hi, I have pretty much the same scooter (only mine is maroon) How and where did you hook up the tach? I would love to see where my RPMs hit, as I feel they are low through all speed ranges. Thanks |
|
|
|
Post by ltdhpp on May 14, 2012 17:32:23 GMT -5
The one I got is just the cheap cheap $20 battery powered one, all you do is wrap the wire coming out of it around the coil wire a few times. The refresh rate is very slow but its great for reading idle and cruising rpms. I could not find a good spot to permanently mount it, so its velcro'ed on for now....!
|
|
|
|
Post by ltdhpp on Jun 2, 2012 12:06:52 GMT -5
|
|


 Pinky size.