|
|
Post by rubicontx on Sept 11, 2008 15:11:38 GMT -5
Here are the steps I followed to adjust my valves: Important: The engine has to be completely cold.Remove the seat, rear storage, rear body panel and the battery: 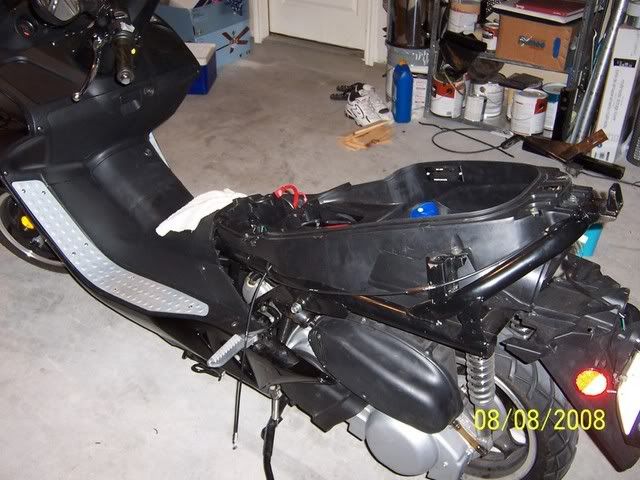 Remove black plastic that holds the battery and fits under the seat. (4 - 10mm screws I think). 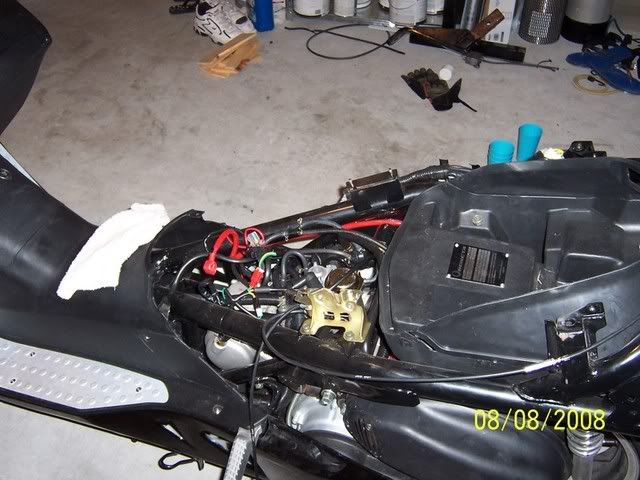 I then removed the left and right lower panels and removed the 2 screws holding the bottom panel: 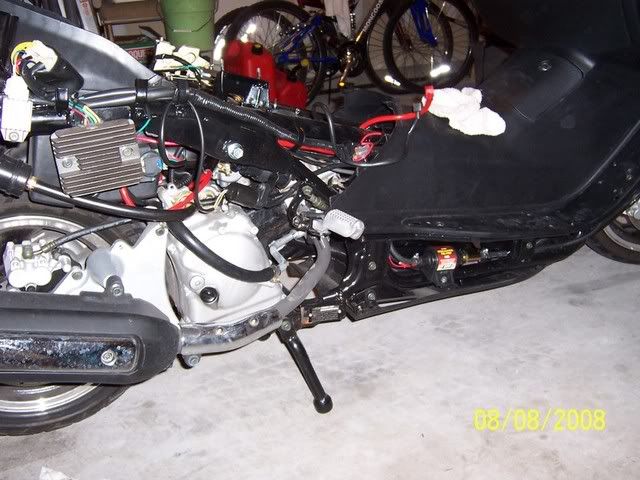 It should hang to give you access to the bottom area:  Access the valves: Access the valves:You should be able to see the top valve door: 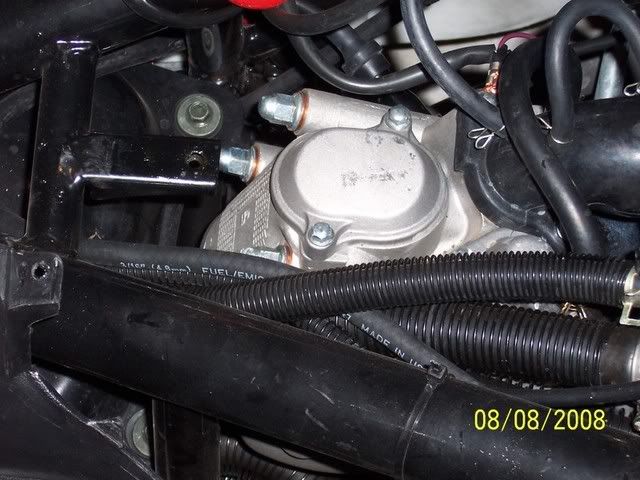 Remove the two screws to get to the valves (8mm socket): 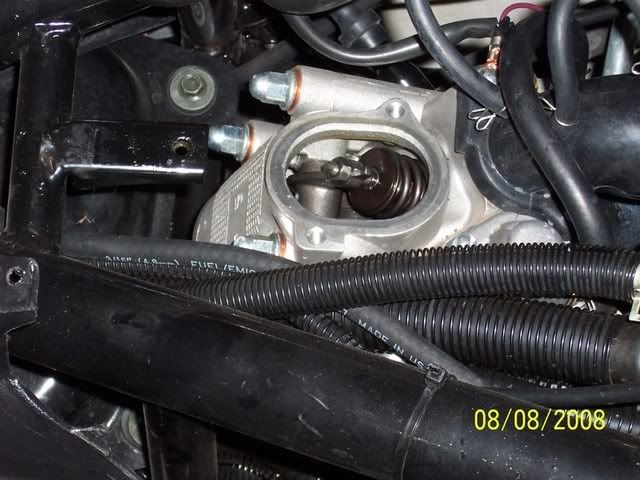 From the bottom of the scooter access the lower valve door (8mm socket & 8mm wrench): Some oil will drip when you remove the cover. 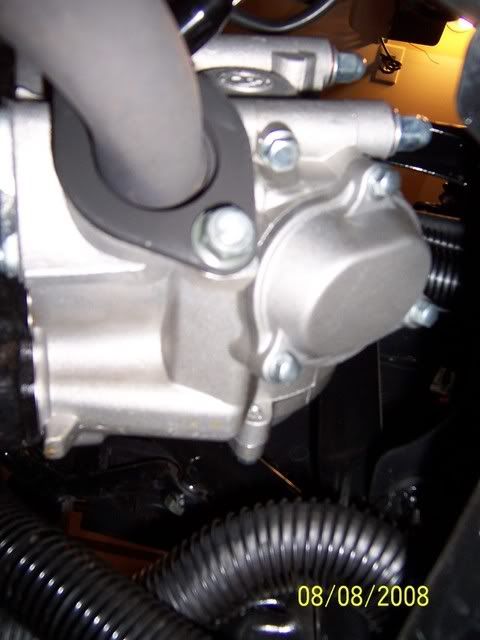 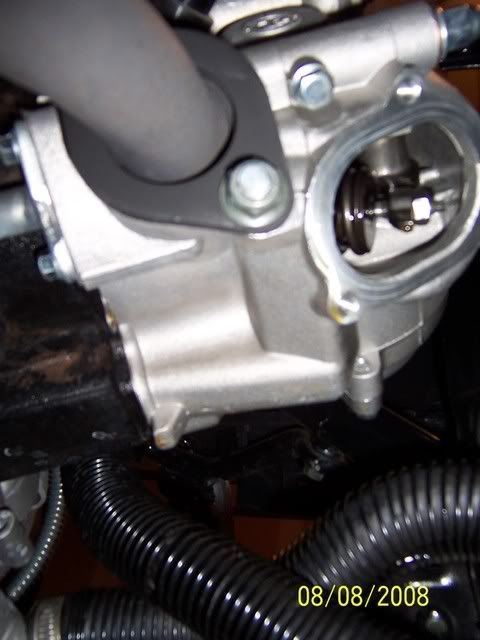 I removed the black plastic cover of the CVT case to access the nut to turn the engine using a 19 socket (3 phillip screws). It's also recommended to remove the spark plug to make it easier to turn the engine. Set the Top Dead Center:My experience has been to align the timing chain with its mark first. You need to remove this cover: (Remove the 2 screws holding the cover) 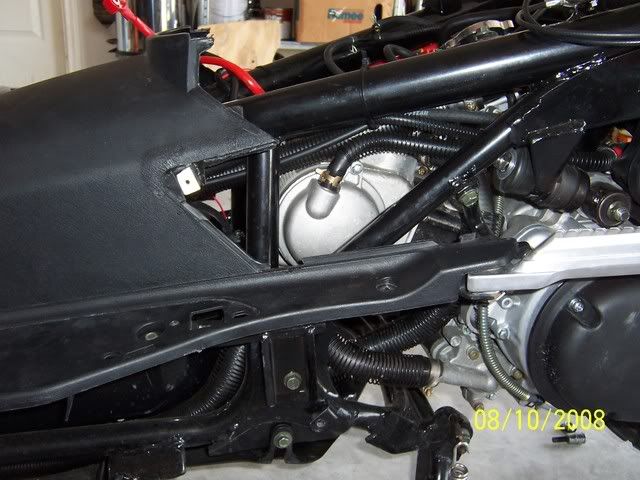 Then align the mark that's located in the timing chain sprocket (see below): 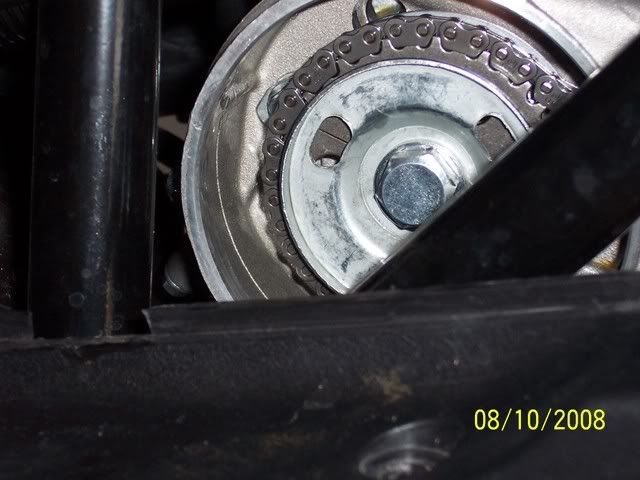 Next check to see if the alignment mark that's located above the oil fill is also aligned. If it is not, then give the engine a complete turn until the timing chain mark is aligned again with its mark. Check again until both marks are aligned. On my scooter it took 3 turns to get both marks aligned at the same time. You can see the mark aligned with the side of the hole: 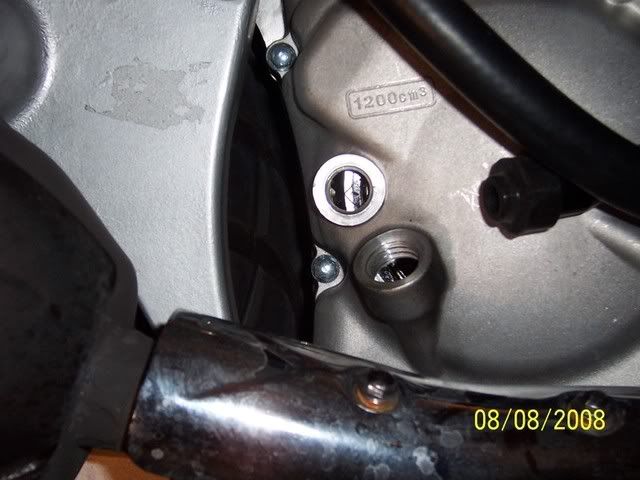 Once the marks are aligned, then use a feeler gauge to measure the gap like in this picture (posted by bigguy):  Here are the steps to adjust the valves: 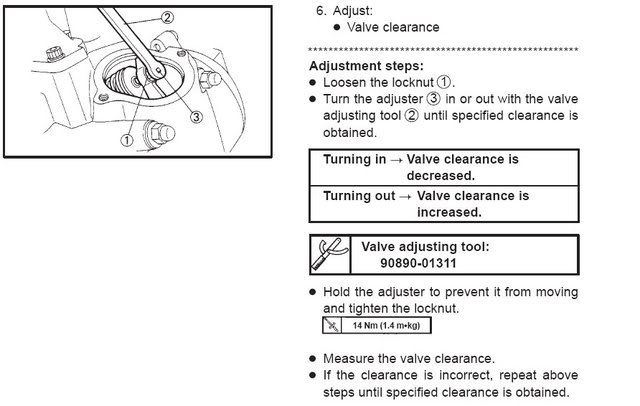 Put everything back together and your done. |
|
|
|
Post by yarddogbbq on Sept 11, 2008 15:36:15 GMT -5
darned beautiful aint it, what a nice engine.
while you have it apart torque the cap nuts again. not the rocker nuts the head cap nuts.
when engine cold.
yarddog
|
|
|
|
Post by widehide on Sept 11, 2008 18:07:31 GMT -5
Rubicontx, Great post, thanks, Hey i will ride mine over from Austin and let you do it. No I can see that is quiet a job. But when mine needs it I wouldl be happy to pay you. Here is a bone, good job.
|
|
|
|
Post by hugh on Sept 11, 2008 19:19:02 GMT -5
Excellent post with great pictures. Due to all of the valve adjustment discussions on various forums I plan to adjust mine at the first opportunity.
|
|
|
|
Post by earlwb on Sept 11, 2008 21:19:11 GMT -5
Nice job, good instructions. I like it.
|
|
|
|
Post by rj on Sept 12, 2008 7:10:52 GMT -5
Nice job Rubicontx,
I used your detailed instructions for adjusting my valves yesterday and I couldn't have done it without them. Next time though I think I will take the time to remove the fuel tank because I think it took a lot longer without doing so. Gotta give you a bone for a great post...Rj
|
|
|
|
Post by rubicontx on Sept 14, 2008 13:23:32 GMT -5
This site gave me plenty of help when I first got my scoot, I'm just glad to be able give something back...
|
|
|
|
Post by scootped on Sept 16, 2008 9:33:04 GMT -5
Thanks for sharing!
|
|
|
|
Post by earlwb on Sept 16, 2008 14:19:03 GMT -5
I should mention, that one can also remove the plastic air intake cover over the CVT intake, and you can then use a socket wrench to turn the variator on the end of the crankshaft to set the engine for TDC.
|
|
|
|
Post by fastasssr20 on Sept 16, 2008 16:42:49 GMT -5
sweet post +1 for you
fastasssr20
|
|
|
|
Post by ebscoot on Sept 18, 2008 15:08:03 GMT -5
Where are the marks located on the timing chain.I adjusted my vavle the other day and didn't line up the mark on the timing chain. Now the scoot want hold its idle.......I guess I should've printed this out so I woudn't skip a step! LOL
|
|
|
|
Post by rubicontx on Sept 19, 2008 8:56:00 GMT -5
|
|
|
|
Post by ebscoot on Sept 19, 2008 10:29:33 GMT -5
Thanks Rubi,
I thought that was it but I haven't took off the cover to see.Well I'm going to job back on this tonight and see if that is my problem as far the idle goes.Thanks for the thread.I'm throwing u a bone!
|
|
|
|
Post by JiuJitsu on Sept 20, 2008 8:30:36 GMT -5
Rubicon TX, I have been waiting for this post so thank you very much!    Check out the date I started this thread!: scootdawg.proboards59.com/index.cgi?board=200cc&action=display&thread=10150A bone for you - I am goin' in!!!  I will link your thread to mine too so people that find mine will be directed here... If I get this right I am gonna come back and throw bones at ya for days!!! I have all day, no one else home, got my feeler guage last nite... taking a deep breath... I'll let ya know how this goes, this is pretty deep for me! Thanks for the thread!!! |
|
|
|
Post by JiuJitsu on Sept 21, 2008 15:18:52 GMT -5
Well I did it but no difference I can see, still very hard to start in the cooler mornings.
I'll keep giving bones though for the excellent post, I could never have done the adjust without it.
|
|
|
|
Post by satellitehead on Oct 3, 2008 14:35:48 GMT -5
I have the other 250cc motor mine does not look like the one pictured above is there a how to on how to adjust valves for a 2006 Tank 250cc. Thanks in advance!!
|
|
|
|
Post by glassvial on Oct 3, 2008 16:15:18 GMT -5
You probably have the CFMoto/244cc engine, valve job is different for that motor. I think someone posted how to do it on the forum, but I could be mistaken, try a search.
|
|
|
|
Post by Rockin Ran on Oct 3, 2008 17:02:46 GMT -5
|
|
|
|
Post by smorkle on Oct 3, 2008 18:38:18 GMT -5
Thanks for this fine post. I was able to adjust my valves today because you took the time to document how you did it. And very well I might add.
One issue that I had was that I had a hell of a time finding the spot where the timing chain was located. Maybe I'm a dunce, but an arrow on the picture would help out. I figured it out though and all is well.
Secondly the third bolt on the lower valve cover was a royal pain to get off. The gas tank is so close on mine that I couldn't get a socket and ratchet on the thing and my 8mm open end wrench just slipped off. Finally got it off with a small pair of channel locks.
While I had it out I decided to replace the spark plug. O'Rileys auto parts had the exact same plug in stock and the guy told me that NGK was a good plug. I asked him if he had any other options and he said he could order some, but didn't have any and really couldn't recommend anything. The plug was not completely fouled but it was black and I figured it couldn't hurt anything.
All in all my machine idles better now, which was why I ventured out into this uncharted territory anyhow. I did not notice any increase in power or acceleration nor top speed. I took it on a 15 mile trip after I was finished and it did well.
The thing runs the way it is supposed to and I'm glad that I learned something new today.
Thanks rubicontx!
|
|
|
|
Post by Rockin Ran on Oct 3, 2008 18:46:03 GMT -5
WTG Smork! Scoot on bro!
Have a bone.
Ran
|
|
|
|
Post by petedeltona on Oct 6, 2008 12:08:06 GMT -5
hello to all you great dawgs. this site is awsome. well, after two weeks of stalling out at each stop light i decided to adjust my valves, after reading all the similiar problems i decided it just had to be the valves. my mc -54-250B ROKETA had 800 miles on it and kept stalling everytime i would come to a stop. i hire a scooter mechanic for $100 to do it because i was to lazy to take all the plastic off. i showed him the scooter dawg site and he was impressed with the great instructions and pictures that rubicontx provided. the scooter runs great. no hesitation and great pick-up. the mechanic said he would be joining us dawgs he was very impressed with all the info that is given on this site..im not going to toss but hand rubicontx 2 bones and hope he doesnt bite. thanks eveyone for all your great ideas and input
|
|
|
|
Post by jim63 on Oct 6, 2008 13:54:12 GMT -5
Slowly watching my scooter get progressively harder to start for past couple of weeks, almost getting stranded at work due to non-starting, and the kicker yesterday went out go for a ride yesterday and it wouldnt start at all decided it was time.
Followed the excellent tutorial by rubicontx, took me about 4 hours to complete. I also modded the underseat panel, cut it so forward 1/3 (part with battery tray and about 2" back) can be removed without having to dismantle the scooter, giving total access to top of motor. It still uses original hardware, 4 screws and presto total access. Used an electic saw for a clean cut, gap is almost non-existant.
Scooter is back to its happy, good running self again. Scooter fires up 1-2 attempts and doesnt die, dont have to give it gas to keep running till warmed up. Bone to you rubicontx, much appreciated the excellent directions with the pics that really make great.
|
|
|
|
Post by cptk on Oct 7, 2008 14:06:43 GMT -5
 really liked the post...have the same bike&luv it. Would like to do this next weekend, but what are the numbers for clearance? and where does a guy get them from? How about a whole manual? Long time looker at the dawgpound first time postin.
|
|
|
|
Post by glassvial on Oct 8, 2008 16:03:09 GMT -5
 really liked the post...have the same bike&luv it. Would like to do this next weekend, but what are the numbers for clearance? and where does a guy get them from? How about a whole manual? Long time looker at the dawgpound first time postin. Welcome aboard. Good catch, rubicontx forgot to put the clearances in the OP! Oops... Anyway, for this engine (Linhai 257cc/clone) it's .004 for intake and .004-.006 for exhaust. |
|
|
|
Post by fairtaxted on Oct 8, 2008 19:34:14 GMT -5
I HAD a Roketa MC-54-250b issue that was resolved with the instructions here, thank you.  Check out my Youtube video prior to the fix. I show how it stalls. Hope this helps someone!!! www.youtube.com/watch?v=3yknkYm26ag |
|
|
|
Post by widehide on Oct 9, 2008 9:10:16 GMT -5
rubicontx,
Thanks for this great post, I am finally getting ready to attack the valve adjustment process. I have done this many times on all my other bikes, but this is a bigger problem due to all the panels to remove, I always seem to come up with extra screws or clips, Thanks and another bone for you.
Oh have you picked up your bigger Scooter, saw your Ad, wish I could get your Scooter, It looks real good with lots of extras.
|
|
|
|
Post by glassvial on Oct 9, 2008 14:22:42 GMT -5
I HAD a Roketa MC-54-250b issue that was resolved with the instructions here, thank you.  Check out my Youtube video prior to the fix. I show how it stalls. Hope this helps someone!!! www.youtube.com/watch?v=3yknkYm26agCool video, why not make a video showing how to do the valve adjustment while you're at it, I'm sure that would help everyone in addition to the pics. |
|
|
|
Post by widehide on Oct 9, 2008 16:39:55 GMT -5
Horray,
I finally today got after the valve adjustment, sure enough the exhaust tappet had zero clearance. The intake was ok. It took me 6 hrs and I am pooped. Good news it solved my start up problems, touch the starter and it runs smooth. I still like the enricher on off switch, I know my enricher turns off real soon way before warm up, so I will just use the switch. Thanks all for your help. Time to ride now, oh well maybe not, I think it is Margurita time instead. Adios
|
|
|
|
Post by cptk on Oct 10, 2008 2:03:14 GMT -5
O.K.
Thats it ...I'm gonna do it this Sat. Valve Adj. ,Spark plug ,Fuel mixture (cuz it's gettin cold at night up here & thats when I ride home) and lots of cleaning. I'll be sure to have plenty of brew on hand to test drive when I'm done. Anniversary ale will be the flavor of the eve. And I'll toast one to you dawgs.....
|
|
|
|
Post by cptk on Oct 12, 2008 22:36:23 GMT -5
Dang, what a difference....... not only does she purr like a kittie once again without stallin...she is all waxed up and shinning like never before. I cleaned everything from the frame, inside the variator, air cleaner & ect...Not to mention after checking this out adj. valves was a sinch...Also I actually pulled the two back panels off as one..The only tricky part wqas the seat latch...But it was easier than dealin with the screws around the tail lights..That did make a difference. Thanx once again rubicontx....Also thanx glassvial for the #'s
|
|


 MC54-250B - "Roketa Cyprus" - 8,200+ miles since April '08!!!


 really liked the post...have the same bike&luv it. Would like to do this next weekend, but what are the numbers for clearance? and where does a guy get them from? How about a whole manual? Long time looker at the dawgpound first time postin.
 Check out my Youtube video prior to the fix. I show how it stalls. Hope this helps someone!!!