|
|
Post by greginhershey on Sept 5, 2008 20:58:15 GMT -5
have a bone for a very interesting thread... thanks...
|
|
|
|
Post by kink on Sept 8, 2008 10:27:46 GMT -5
have a bone for a very interesting thread... thanks... cheers man! |
|
|
|
Post by kink on Sept 29, 2008 12:39:46 GMT -5
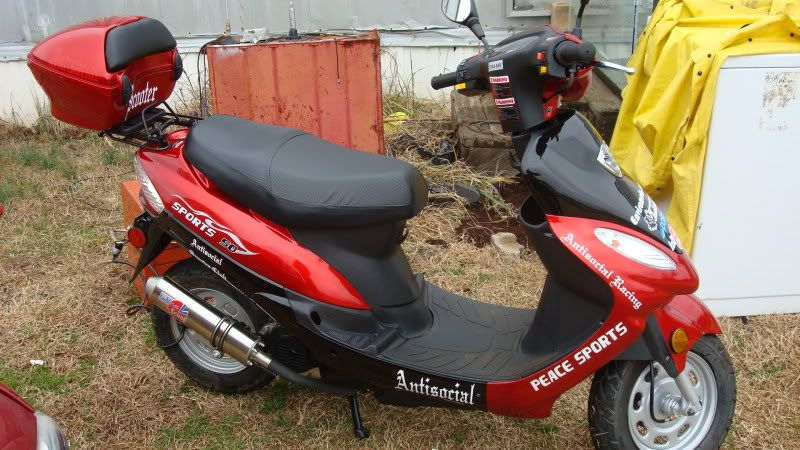
So, an update: I put off re-jetting the carb in favor of first installing an electric fuel pump. I placed an order for the following parts: Fuel Pressure RegulatorElectric Fuel PumpFYI I didn't actually order them from Jegs. I had planned on picking them up at NAPA but apparently in Canada NAPA only stocks OEM replacement parts (mostly for cars) so I had to order these parts through a local performance shop. I also picked up a 12v automotive relay, fuse holder, and associated wiring stuff to hook it all up. The fuel pump should be available for pick up tomorrow and I can do the install later this week. Also, last night I finished replacing the stock mirrors with a new set of super awesome mirrors I sourced from a local mountain bike shop: Mountain Bike MirrorsThese lightweight convex mirrors actually mount in the end of the bars. Since my grips don't have removable end caps the install required some cutting and modification of the left side grip and the throttle assembly. Once I carefully measured the throttle I actually cut the end clean off and then used a file to round it down and make it look nice. The inside plastic sheath was white so I colored the end of it black with a sharpie. I will post pics of the mirror mod ASAP. I forgot my camera when I was down in the parking garage. I like the new mirrors, they are lightweight but strong carbon fiber and I find they vibrate a lot less than the stock ones. Plus they stick out an extra inch or two so I can see around myself quite easily. Finally, they are convex which gives me a much more comprehensive view of what is behind me. Oh, and they look really cool too  |
|
|
|
Post by LARC0 on Sept 29, 2008 15:40:51 GMT -5
Nice mods  I love the moutainbike mirrors the best... hmmmm |
|
|
|
Post by kink on Oct 1, 2008 10:18:58 GMT -5
Nice mods I love the moutainbike mirrors the best... hmmmm Cheers! I think they are my favorite mod as well. Getting rid of the stock mirrors makes the front end profile of the scooter appear a bit lower, which makes it look less like a scoot and more like a bike... I've been lazy about pics, but I'm hoping to get some nice ones once it stops raining. Gotta find a nice sunny day to detail the bike and bust out the Digital SLR! |
|
|
|
Post by kink on Mar 5, 2009 14:53:33 GMT -5
Well, it's been a heck of a long time since I've posted in my show and tell thread. I've had the scooter in storage for the winter and it has been totally inaccessible for any mods or repairs.
When I packed up the scooter in the fall I had just installed an electric fuel pump/pressure regulator and it had definitely improved performance and smoothed out fuel delivery (no more bogging on steep uphills!!). Unfortunately the 1 amp draw from the electric pump seemed a bit too much for the charging system to keep up with and the battery was draining dead once every couple of days.
In order to counterbalance that extra power draw I have just ordered a flywheel puller and as soon as that comes I'm going to head over to my storage site and start doing the preliminary work towards a stator upgrade!
More updates soon (hopefully).
|
|
|
|
Post by kliff on Mar 15, 2009 16:51:15 GMT -5
Mirror pics man....mirror pics....
|
|
|
|
Post by kink on Mar 19, 2009 6:34:49 GMT -5
Mirror pics man....mirror pics.... yeah, i just received my flywheel puller in the mail so i'll probably be heading over to where my bike is stored within the next week or two. once i've got it out of storage i will be sure to take some proper pics with good light. |
|
|
|
Post by Troll on Mar 24, 2009 7:20:07 GMT -5
Where's them pics of that catch can mounted. I like that idea of a home made one, I might try it my self. I get tired of cleaning oil off my CVT cover, it's not bad but you can tell it's for the oil vapors.
|
|
|
|
Post by kink on Mar 24, 2009 12:39:11 GMT -5
I'm getting the bike out of storage this weekend, so hopefully some pics will be up soon.
I'm also going to be doing a full LED swap and possibly a stator/flywheel/rectifier upgrade as well.
|
|
|
|
Post by kink on Mar 27, 2009 14:47:06 GMT -5
Tomorrow's the day, I'm grabbing the scoot out of storage tomorrow morning!
It's looking to be a beautiful day as well so hopefully I will have a chance to take some nice photos of the scoot on the first day of riding season!
|
|
|
|
Post by kink on Mar 28, 2009 17:34:33 GMT -5
|
|
|
|
Post by kink on Mar 30, 2009 9:28:09 GMT -5
So, as promised here is a pic of the oil catch can and the electric fuel pump/pressure regulator system I have installed:  The view you are seeing is the inside left side of the scooter with the bucket removed. To the left is the rear of the scoot and the fuel tank. To the right is the front of the scoot. The red canister at the top is the oil catch can. You can see the air filter breather to the left. You can't see the rubber hose inlet which leads up from the valve cover because it is behind. Next time I have the plastics off I'll try and remember to get a pic from the other side. Below that you can see the fuel system I installed. On the left is the fuel filter, followed by the pump which is the black unit in the middle being held on by yellow zip ties, and the silver dial shaped unit is the pressure regulator. The wiring for the fuel pump was pretty basic. Power directly from the battery (with an inline fuse) goes to a 12v relay, shown here:  The switching current for the relay comes from the output of the ignition switch (key) and goes to this switch:  I then drilled a hole in the plastic just under the steering head for installing the switch (I used one of those oddly shaped carving bits for drilling big holes in wood):  Finally I installed the switch:  You can see in this next pic that the switch has a little LED which comes on when the switch is in the on position. I thought this was a nice touch:  I picked up these snazzy switches from a local electronics surplus place. They were $1.50 a piece and came with a variety of different colors of LEDs. I have a green one for when I move my headlights over to DC. I plan on installing the switch right next to the one for the fuel pump. So now, when I turn the bike off the pump automatically shuts off (because it is wired to the key) but I also have the option of turning it off while the key is in via the switch. |
|
|
|
Post by kink on Mar 30, 2009 10:08:34 GMT -5
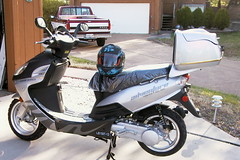
As you can tell from reading this thread, I live in an apartment building and do all my work on the scooter in my parking spot. This has historically been a total PITA due to lack of decent lighting, no electrical sockets, and sharing a dual space parking bay with another vehicle. This year I hunted around a lot more carefully before registering my parking space. I found a new spot which is 100x better than last year's. For starters it is a single bay instead of a double so I'm not sharing with someone else. It contains a drainage pipe running floor to ceiling in the corner, perfect for chaining up the scoot. In addition it has a flourescent light tube right at the front end of my spot, giving it lots of light. Finally, the previous spot owner has gone through the effort of painting the walls of the bay a bright white, which increases the light in the spot by a wide margin. It is so much easier to work on the scoot now that I can see what I'm doing. Here's a pic:  Note how dark the bays to either side are by comparison. Here's a pic of the rest of the garage so you can get an idea of why I'm so excited by this spot:  Now if I could just find an electrical socket within reach of my extension cord... |
|
|
|
Post by kink on Mar 30, 2009 11:13:20 GMT -5
I picked up a 12V 1A solar charger kit at Canadian Tire for $8 on the weekend. Included in the kit was the following: - Wiring Harness to hook up to battery (including 1A fuse)
- Extension Cable
- Solar Panel
- Jumper Cables (not shown in picture)
 Simple install. Wired the harness up to the battery and ran the connector out the same hole all the rest of the wires run out. Plugged in the extension and wrapped the connection in electrical tape. My plan is to leave the extension plugged in so that it reaches up into the bucket, then just coil it up in there for when I need it. I tie wrapped the cord up to the frame leading up to the bucket so it doesn't rub on anything. Then I attached the solar panel to two 4' straps with buckles to secure it to the seat. The buckles fasten up under the seat, as does the electric plug. This way I can leave it hooked up and parked in the sun near my work for a bit of extra charge, without the risk of someone stealing the solar panel. I'm sure they could get it if they really wanted to, but it would involve cutting straps or loosening bolts, and if they really want it that bad they can have it... Anyways, here's a pic of it all set up:  Obviously I remove the panel while riding and only set it up for charging if I'm going to be parking in the sun for extended durations... The solar panel and jumper cable attachments both fit neatly at the bottom of one of my saddlebags. It's been too cloudy to test it so far, but we'll see how it goes. Even if the solar panel doesn't turn out to charge all that much, having the easy to use jumper cable attachment ensures that I can easily get a boost if needed. Unfortunately, with all the extra stuff hooked up to the battery, the battery compartment is getting kinda crowded. I'm thinking of mounting a connecting block with fuse panel up inside the glove box, but that would require either heavily modifying the wiring harness, or making a lot of extra connections to extend all the wiring, neither of which is something I want to do. I'll have to give that one a bit of thought... |
|
|
|
Post by kink on Mar 30, 2009 12:01:39 GMT -5
Ever since I installed the electric fuel pump I've been having charging problems. I looked into doing a stator upgrade, but decided to try a cheap and easy solution first. So I've placed an order for a set of LED bulbs to replace the stock stuff.
I put my order in with Superbright LEDs last night. Here's what I got:
Running Lights:
Quantity: 2
Product: WLED-x5 LED Wide Angle LED bulb $ 2.99 (each)
Options: Cool White WLED-CW5 0.95
Tail Light (Brake):
Quantity: 1
Product: BA15 5-Watt LED bulb $ 29.95 (each)
Options: Red 1157-RLX5
Signal Lights:
Quantity: 4
Product: BA15 12-LED bulb $ 4.99 (each)
Options: Amber 1156-A12 Wide
Digital Flasher:
Quantity: 1
Product: Universal Motorcycle Flasher $ 8.95 (each)
Options: LF1-S-FLAT
I didn't order anything for the license plate light, because I want to find out whether it is mandatory in Canada to have such a light on a motorcycle. If it isn't, I'm going to remove the whole housing and put a red reflector there instead. If it is then I'll have to order another bulb like the running lights I got.
|
|
|
|
Post by kink on Mar 31, 2009 14:30:48 GMT -5
Further to my last post: the license plate light is mandatory in Canada so I amended my order and had them throw in an extra wedge bulb. I'm using the same bulb for the license plate as I'm using in the running lights.
If this doesn't help the charging system I'm going to look into swapping the dash instrument and turn signal indicator lights to LED.
|
|
|
|
Post by kliff on Apr 1, 2009 18:55:28 GMT -5
Thanks for the pics of the mirrors kink. Picked up a set today, from the local bike shop, will have 'em on this weekend.... the stockers are a joke...IMHO.
|
|
|
|
Post by kink on Apr 1, 2009 21:41:10 GMT -5
Thanks for the pics of the mirrors kink. Picked up a set today, from the local bike shop, will have 'em on this weekend.... the stockers are a joke...IMHO. I agree. Now that I've got these ones on there I don't know how I lived without them... |
|
|
|
Post by Troll on Apr 2, 2009 6:21:04 GMT -5
Pic look great, working on a catch can myself. Kinda using you ideas, but hell it's cheaper then buying one. +1 dogg
|
|
|
|
Post by numbski on Apr 23, 2009 7:17:43 GMT -5
I have that exact same bike - wondering if you have any tips on how to get those mirrors installed. If I read you right, you took a hack saw to the twist grip on the throttle?
|
|
|
|
Post by kink on Apr 29, 2009 11:14:28 GMT -5
I have that exact same bike - wondering if you have any tips on how to get those mirrors installed. If I read you right, you took a hack saw to the twist grip on the throttle? Pretty much. The left side is easy to install, just cut away some of the rubber and you will see a metal tube underneath. You need to mount the mirror so the compression mount fits inside the tube. It's really easy once you get started. Cut away LESS than you think you need to. You can always cut more but if you cut too much then your grip will need to be replaced (or look like crap). The throttle side was a bit more tricky. You need to take the throttle off and figure out how long the tube is underneath. Then you need to measure and cut the end off the throttle tube so that you can mount the mirror inside. You will notice that the metal tube inside the throttle does not extend all the way to the end of the grip so you can't install the mirror all the way flush with the metal tube. Also, you want to make sure the rubber from the throttle grip can't contact the protruding mirror mount, or you could run the risk of the throttle jamming open. This was one of the trickier mods to do and have it look good and work properly. Get all your parts together, visualize how they go together, then measure twice, cut once and you should be fine. |
|
|
|
Post by kliff on May 3, 2009 13:39:53 GMT -5
Get a tach too Kink. On flat level, my scoot will wind to 7900, and stay there with no "apparent" strain, and buzz to near 9000(with rev limitter kicking in) on down hills. None of that will be good for valve springs! I try to cruise at a self imposed limit of 6500rpm, and manually start bringing in the reigns about 7500, ESPECIALLY downhill. 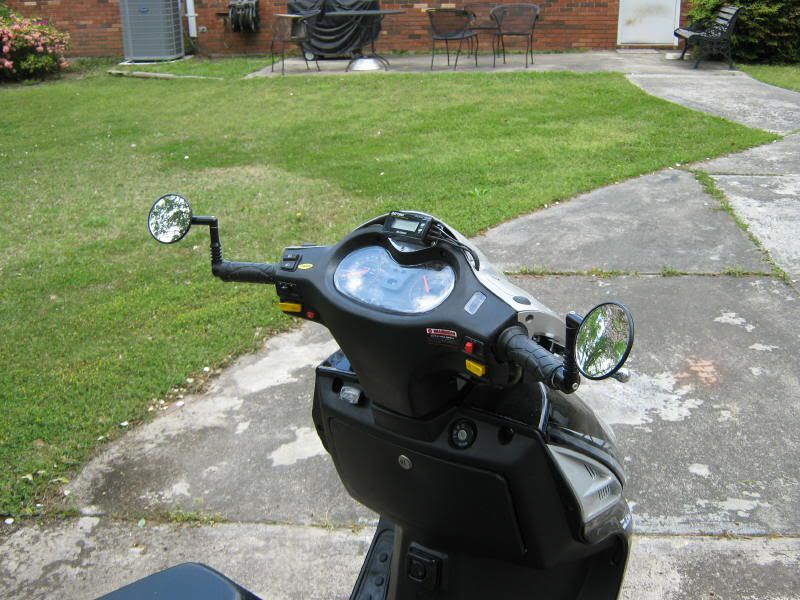 |
|
|
|
Post by kink on May 14, 2009 12:01:56 GMT -5
that is good advice kliff. unfortunately my scoot was totaled two sundays ago. i'm probably not buying another scooter, looking at some entry level motorcycles instead.
|
|
|
|
Post by kink on Oct 13, 2010 10:35:46 GMT -5
As mentioned in the first post of this thread I am currently in the process of resurrecting this scooter. The purpose of this build will be to eventually sell the finished product, as I already have a daily driver motorcycle. I am hoping to "learn the ropes" as I go with this build, as it's definitely the most complex and involved modification of a vehicle I've ever done by myself. If this goes well, I will be making a hobby of purchasing cheap "basket case" motorcycles and restoring/modding them and then selling em!
OK, On to the REBUILD:
Since most of the fairings were destroyed in the crash, I will be going with a "naked" concept (ie no fairings at all). With this in mind, the first thing I am doing is cutting off all of the little metal "tabs" on the frame which used to hold on the plastic, bucket, air intake, floorboards, etc. Once I get all of that sorted I'm having a friend weld a cross bar from the front of the seat to the fork tube just under the handlebars and mounting a small motorcycle fuel tank on it.
After completely disassembling the scoot, I noted that the front shocks are damaged beyond repair. I will have to decide whether to just order a replacement pair or completely replace the front end of the bike with forks, handlebar and wheels from a salvaged motorcycle (there is an excellent bike salvage yard nearby). Either way I will definitely be replacing the handlebars with some motocross style bars.
I am planning on replacing intake, exhaust, all the wiring, possibly a new carb or at least re-jetting, new lighting all around, and a new seat. I'm going to have to hit the salvage yard for a lot of stuff, I want to try and avoid paying for pricey aftermarket stuff where possible and using budget salvage or surplus parts. I want to keep costs down. As much as this is a labor of love and a hobby project, as previously mentioned I will be selling this bike when it's done and I want to try and keep the budget low so I can price it affordably.
I'm thinking of going for a sort of stripped down "urban assault vehicle" look. Possibly going to use army surplus ammo cases as pannier boxes. I think the asthetic will be pretty cool when it's done.
STAY TUNED FOR PICS TO FOLLOW...
|
|
|
|
Post by kink on Oct 13, 2010 11:15:56 GMT -5
Here's some pics of scooter parts scattered all over my garage:      these pics were taken before i actually got to work on the rebuild. the frame has been significantly stripped down since the above pic was taken. i have been removing all the metal tabs which used to hold the plastic on or mount the fuel tank and airbox. the frame looks much cleaner now. i will try and snap a couple of pics sometime this week to show the progress. Also, other exciting news. Since this thread last died out we have purchased a house! Our new place has a detached 1 car garage with a large workshop at the side! I have just finished getting all my tools and workspace organized and since it's away from the house I can make all sorts of noise and not bother anybody. It's much better than my previous set up of working on the scooter in the underground parking of our old apartment... I'll try and get pics of the new workspace posted soon as well as better (non blurry) pics of the scooter rebuild in progress. |
|
|
|
Post by voorhees on Oct 13, 2010 11:35:43 GMT -5
Hey kink i'm just now reading your thread...looks like you used to live downtown before you moved out of the core? I'm close to Allan Gardens myself. Funny, when I saw your photos of going down to the waterfront in Etobicoke a few posts up, I was there just this past Saturday! My friend bought a condo nearby and I rode my scooter out to visit her. We packed a lunch to eat on the rocks in the background of that second pic... LOL how random is that.
|
|


 I love the moutainbike mirrors the best... hmmmm