|
|
Post by wingcommander on Dec 26, 2009 15:05:46 GMT -5
Hi I have a 2005 Geely Jalon Venicia JL50QT-21 4 stroke, and I'm having some major issues, I just bought this bike and the carb was no good so I replaced that with a new one that I attached the pic of. New carb has place for fuel line & another hook up but I don't know what hooks up their (I have it circled)  Also The scooter will not go now, I am running a size 35 main jet (new carb had a 30 but I but the old carb jet in it) and now it won't run faster then like 1mph?? Also it won't idle on its own? Please help!! Stephanie Attachments:
|
|
|
|
Post by ILLGotti on Dec 26, 2009 15:09:37 GMT -5
That other hose is your carb drain hose. THere should be a screw at the end of that line if you unscrew it, gas should come out. Its for draining your carb.
|
|
|
|
Post by cyberbeer65 on Dec 26, 2009 15:11:44 GMT -5
|
|
|
|
Post by wingcommander on Dec 26, 2009 15:16:37 GMT -5
Ok so nothing is supposed to be hooked up to it then? And yes gas did come out of that one screw. And I'm afraid to do a valve adj. because I'm on my own  |
|
|
|
Post by wingcommander on Dec 26, 2009 15:26:29 GMT -5
also I used a sytenthic blend oil at 10w/40 could this have messed something up because when I bought the bike it was working, but it would hesitate between 15-23 then it died after putting seafoam in the gas (then I ordred a new carb) and since the new carb I haven't been able to get it to work right so today I changed the oil / got a new spark plug. And I've now got the issues of it going about 1MPH If I'm lucky? It was running last night but not idleing? I took it out around my apartment for about 3miles and it stopped again which is why I did what I did today. Now I can't get it to do anything?? Attachments:
|
|
|
|
Post by cyberbeer65 on Dec 26, 2009 17:42:58 GMT -5
Doing a valve adjustment is just as easy as switching out your carb. The link I posted has step by step instructions.
I'll bet dollars to doughnuts that doing a valve adjustment will solve your problem.
|
|
|
|
Post by wingcommander on Dec 26, 2009 20:21:48 GMT -5
Ok I'll try it on Monday and let you know if it helped, or if I totally messed up my scooter  I'm gonna go visit my grandparents and get the tooks I need to do the adjustment. So all I need is the feeler gauge and my normal tool set for MM sockets? Do you think the jets I put in my carb. are ok? or should I put the ones that came in the carb back in? Thanks again. |
|
|
|
Post by tortoise on Dec 26, 2009 21:47:07 GMT -5
I am running a size 35 main jet The jet sizes on my stock 2005 Geely-Jalon 139QMB 50cc 4-stroke are 85 main (.85mm/.0335 inches) and 35 idle/low speed (.35mm/.0138 inches).  |
|
|
|
Post by ILLGotti on Dec 26, 2009 23:59:39 GMT -5
Sorry I didn't get back to you sooner, I was at work all day. O.k. first off, that hose we were talking about should route down to your CVT (transmission) cover. On the bottom-most left side of the cover is where my fuel drain line is connected. It should mount using one of the CVT covers mounting screws.
Your 10W40 synthetic probably did not mess anything up. Unless your scooter is BRAND new. If you have more than 3 or 4 hundred miles on the scoot, your fine. The only issues I have heard of with synthetic oil, is if the motor is new. The synthetic will glaze over the inside of the bore and not allow the piston rings to seat properly.
Don't be afraid of the valve adjustment. Just make sure you follow a few steps.
1. Put the scoot on its center stand
2. Take your seat off, and remove that body panel that is right below the seat, between your legs when your sitting on the scoot.
3. On the right hand side of the scooter, you will find your fan cover. There will be a little 1'' wide rubber stopper/grommet, whatever you wanna call it. Remove that with a flathead screwdriver.
4. Remove your valve cover. (There may be a ground wire that is on one of the 4 bolts holding this cover on. Remember where that goes if you have it there too.)
5. (The most important thing) Get your motor to TOP DEAD CENTER. I do this by using my kick start with my hand to turn the motor. There are 3 holes in your cam gear. They are meant to line up with the edge of the head. 2 of the holes are small and one is larger. They should line up like this: o O o
You can double check your top dead center by looking through that hole on your fan shroud. There is a "T" and an "F" imprinted on that copper colored round thing you see in there. It is your flywheel and it rotates with your motor. Anyways you want that "T" to line up with a protruding notch on the inside when you look through that hole. When you see that "T" and "F" through the hole and your cam gear has the "o O o" lined up with the edge of the head, you are good to go.
6. Back to the head. Loosen those two screws with the nut around them by loosening the nut. Get your feeler gauge between the bottom of the screw and the top of the valve. Its best to use a 9mm closed wrench to tighten the nut, while you hold the screw in the proper position with some needle nose pliers.
7. Your done. Put it back together and you should have miraculously fixed it! LOL!
I really hope this helps. It really tryed to word it for newbies, without assuming you knew much, so if you were like "duh, I know that" at any point, I apologize.
NOW GO FIX IT! haha
|
|
|
|
Post by wingcommander on Dec 27, 2009 9:57:46 GMT -5
Thank you! and I'm pretty much like duh, I 'didin't' know that ;D I'm heading over to my grandparents to get some tools so I can try this tomorrow! I guess I'll be brave. I've seen my dad do something very like this and he used to help me but he passed away and I lost my desire to work on things for about two years. This is the first bike I've had on my own and first thing ever tearing apart but helping my dad is what gave me hope I could at least do the carb. Usually he would hand me the carb. tell me to clean it and but it all back together  So I'm basically starting new. Thanks again for everyone!! I'll tell you tomorrow how everything goes. (also does anyone know about this:) My headlight stopped working as well as the speed.&odometer light when I turned my headlights on the night before (its when the bike was actually making it around my apartment faster then 1mph) and they got really bright then both just went out. The turning lights still work as well as the brake lights, and I took the bulb out it doesn’t look burnt out like a normal house bulb, but it does have a black spot on the glass as well as a spring loose inside?? |
|
|
|
Post by ILLGotti on Dec 27, 2009 14:47:06 GMT -5
The spring is normal, it holds the bulb in there tight. The black spot means the bulb is burnt.
|
|
|
|
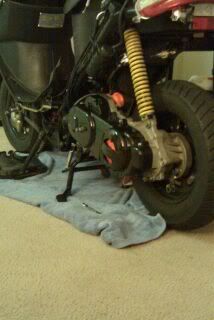
Post by wingcommander on Dec 27, 2009 22:06:28 GMT -5
Ok just to clarify in the pic. below the part I have circled is what I'm removing tomorrow for the adjustment correct? Attachments:
|
|
|
|
Post by ILLGotti on Dec 27, 2009 22:41:20 GMT -5
yes, thats your valve cover. Its held in place with four 8mm bolts.
|
|
|
|
Post by wingcommander on Dec 28, 2009 14:52:37 GMT -5
Having some issues getting the 4 bolts off, someone aparently did them wayyyyyyyyy to tight and I've already blew out 2 drills from walmart I've only got 1 bolt left in the far left bottom that I can't get off? I've JB welded a drill back together but I'll have to wait till tomorrow unless I can figure something else out. I've tried manual screwdriver but it's not working even with a friend and I pulling as hard as we can. |
|
|
|
Post by ILLGotti on Dec 28, 2009 16:40:20 GMT -5
whoa missy... you shouldn't be pulling anything.
You shouldn't be using a drill either.
All you need it a hand ratcheting wrench, an extension piece, and an 8mm socket.
LEFTY LOOSY!!!
they will just unscrew... I PROMISE!
|
|
|
|
Post by wingcommander on Dec 28, 2009 17:34:43 GMT -5
I tried the wrench. (and I just meant with the pulling that we were both pulling 'screwing' towards the left) but it wouldn't budge. The only thing that got the first 3 out was the drill with the socket attached via my extender?
|
|
|
|
Post by ILLGotti on Dec 28, 2009 18:47:46 GMT -5
they are only M6 bolts. They will break from more than 10(ish) Ft/Lbs of torque. They can't be in there that tight.
Can you take a pic of YOUR scoot with your phone or something and circle the screw your trying to get off. It doesn't make sense that you can get them off with a normal socket wrench.
You can always try an old trick I LOVE to use...
Get the wrench on there, make sure it got room to unscrew, and give it a few hit on the end of the handle with a hammer in a counter clockwise direction. Sort of an improvised impact wrench.
I know you can do this on your own...
|
|
|
|
Post by wingcommander on Dec 28, 2009 19:59:35 GMT -5
here is the pic. I'll have to try with the hammer tomorrow. Attachments:
|
|
|
|
Post by ILLGotti on Dec 28, 2009 20:58:07 GMT -5
yeah, I bet those thread were locktite'd, lol
It shouldn't be this much hassle.
|
|
|
|
Post by wingcommander on Dec 28, 2009 22:12:10 GMT -5
That's what I was thinking lol this may be my first scooter motor job ,but I have worked on things with nuts and bolts and NEVER had this much trouble!!!!!! lol ;D |
|
|
|
Post by teknoyd on Dec 29, 2009 8:44:14 GMT -5
On another subject - your oil - if this is a new bike with low miles you should put standard oil in it, not synthetic.
Synthetic is great oil, but don't use it until you've got about 1000 miles on the bike.
The great thing about synthetic oil is that it prevents wear on your engine parts. The problem is that when the engine is new you want the parts to "wear in" so they all fit together smoothly. The synthetic will prevent this from happening.
So, while you have it apart, before you start riding it again, put regular old fashion oil back in it.
Good luck on getting that stubborn bolt out, but be gentle, you don't want to break it. I think that will be the hardest part of this job. After you get that bolt out it should be smooth sailing from there on.
Just be sure to read that post on the valve adjustment a couple of time so it makes sense.
After you think you have it adjusted and tightened back down, be sure you hold the rocker in fingers and jiggle it a bit, then check it again. You may have to re-adjust it a time or two before it is right before you put it all back together. It has to be just right!
Good luck, let us know how it goes. Great looking bike, by the way.
After you get it running make sure you do a PDI while you have the plastic off. It will really help the bikes longevity.
- Tek
|
|
|
|
Post by teknoyd on Dec 29, 2009 8:46:22 GMT -5
Oops! I just saw that it's a 2005 model so obviously it's broken in by now... My bad! Keep that synthetic!
- Tek
|
|
|
|
Post by wingcommander on Dec 29, 2009 9:21:35 GMT -5
After you get it running make sure you do a PDI while you have the plastic off. It will really help the bikes longevity. - Tek Ok I'm new to working on bikes so what does do a PDI mean?? (I don't want to sound stupid but I do want to do everything right!!) BTW thanks for the encouragement everyone!! |
|
|
|
Post by tortoise on Dec 29, 2009 11:10:51 GMT -5
Google search (bottom of page) Still running the original gas and vacuum lines on my 2005 Geely-Jalon. Maintenance guidelines. Variator changeout (personal preference). |
|
|
|
Post by wingcommander on Dec 29, 2009 12:06:33 GMT -5
Thanks feel a little silly now I didn't figure that acronym out myself lol |
|
|
|
Post by ILLGotti on Dec 29, 2009 14:13:18 GMT -5
SO? That bolt come off yet?
|
|
|
|
Post by wingcommander on Dec 29, 2009 16:00:20 GMT -5
The bolt came off!!I tell you JB Weld could save the world HOWEVER the scooter will now go 10MPH lol I tried about 5 diff. times to do the valves and I don't know if I'm not doing it right or what but its still not working. I'm posting a video I know it said your supposed to not hear a knocking but I'm not sure if I'm hearing a knocking or not. Also my gage I bought says (0.004 & 0.006) on the same piece is this the right one? I'm very frustrated I just got off the ground outside from working on it all day and still blah it also was blowing small puffs of white smoke after the last adjustment were I actually rode it for a few mins and it would get up to almost 10mph?? |
|
|
|
Post by tortoise on Dec 29, 2009 17:37:23 GMT -5
I don't know if I'm not doing it right The narration is German (I think), but this video will provide some guidelines. Adjust lash to around .002 inches.  |
|
|
|
Post by cyberbeer65 on Dec 29, 2009 17:56:47 GMT -5
I don't know if I'm not doing it right The narration is German (I think), but this video will provide some guidelines. Adjust lash to around .002 inches. I've had good luck with setting both valves at .004. |
|
|
|
Post by wingcommander on Dec 29, 2009 18:14:32 GMT -5
Thanks for the video it really helped a lot I think I was putting the feeler gauge in to tight. now I have one that the blade I was using is from autozone I attached a pic. of the package so you guys could make sure I'm using the right one I'm using the first one listed (.004 - .006 IN - .102-.152 Metric) is this the right one?? or do I need a different gage? Attachments:
|
|


 Also The scooter will not go now, I am running a size 35 main jet (new carb had a 30 but I but the old carb jet in it) and now it won't run faster then like 1mph?? Also it won't idle on its own? Please help!!


 I'm gonna go visit my grandparents and get the tooks I need to do the adjustment. So all I need is the feeler gauge and my normal tool set for MM sockets? Do you think the jets I put in my carb. are ok? or should I put the ones that came in the carb back in? Thanks again.
 So I'm basically starting new. Thanks again for everyone!! I'll tell you tomorrow how everything goes. (also does anyone know about this:) My headlight stopped working as well as the speed.&odometer light when I turned my headlights on the night before (its when the bike was actually making it around my apartment faster then 1mph) and they got really bright then both just went out. The turning lights still work as well as the brake lights, and I took the bulb out it doesn’t look burnt out like a normal house bulb, but it does have a black spot on the glass as well as a spring loose inside??


