|
|
Post by Bluefront on Dec 5, 2010 17:36:23 GMT -5
Bought one the other day, along with his PCV valve. Just started this project, so there's still the mounting part to go, but I got all the extra parts needed..... 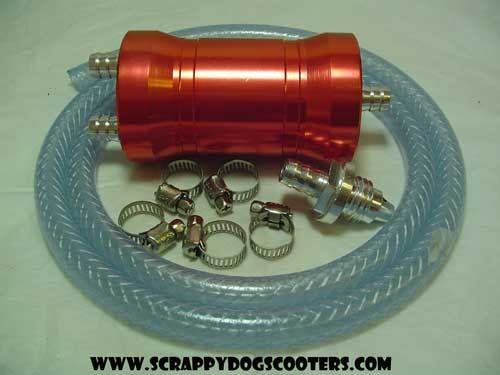 The reason I needed extra parts.....I'm adding a quick disconnect fitting to make checking the oil easy. As it comes, you'd need to remove the rubber line from the fitting every time you checked the oil. I got most of the parts from Harbor Freight. Here's what it looks like complete.... 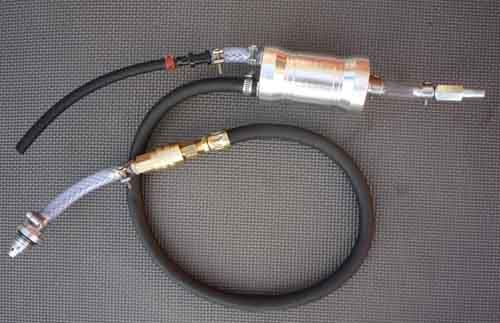 Here's what it looks like with the quick-connect open. It still takes a 22mm wrench to loosen the fitting on the engine...but it's easy. 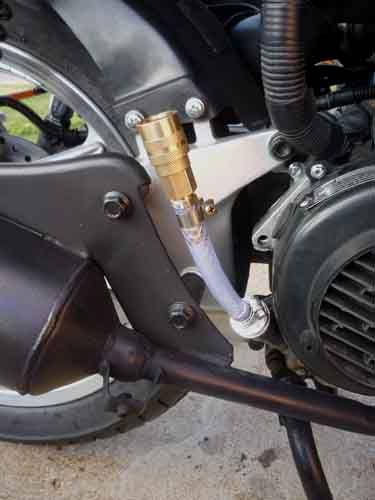 And here's the thing connected... 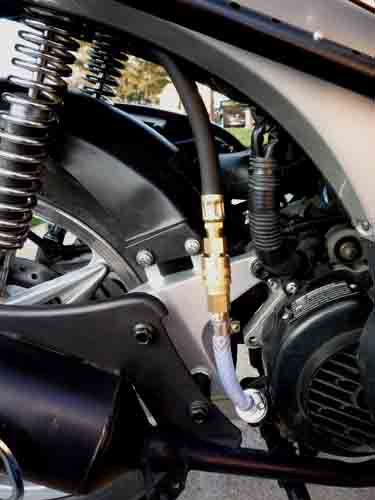 I had to buy a little line reducer fitting from ACE Hardware. The second vent line from the valve cover is much smaller than the fitting on Scrappy's canister. 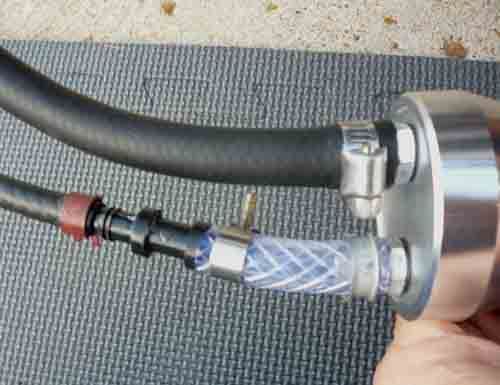 And here's Scrappy's PCV valve. I had to buy a section of vinyl hose (3/8 ID) because the hose in the Scrappy kit was too big to tighten down on the PCV valve. 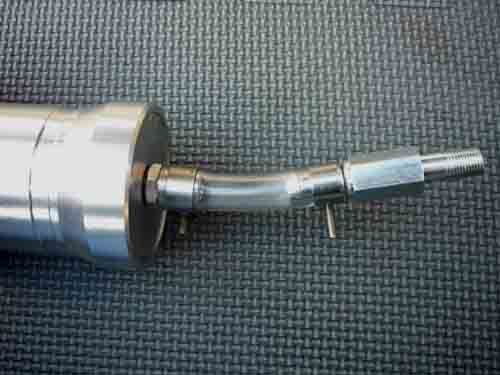 The quick-connection is actually an air-line fitting....the extra parts cost about $20, but will make the whole thing much easier to deal with. I'll start with the mounting shortly.....looks like it will work good, if I can find somewhere to stuff the thing. Questions?  |
|
|
|
Post by Bong on Dec 5, 2010 17:53:42 GMT -5
Way to go blue!!! I was curious of the quality? How and where is it mounted any ideas yet? This system may help with my oil leak. Keep us updated on the good and bad.
|
|
|
|
Post by Bluefront on Dec 5, 2010 18:52:14 GMT -5
It should fit on the right side between the frame and the outer plastic.....somewhere around the upper shock mount. I'll run the other line over to the left side, then forward and down to the valve cover. I haven't even looked under there yet......but I've been in there a bunch of times, so I sort-of know what I'll deal with.
I haven't decided about the output from the PCV valve.....might run it to a PCV filter. That's how the valve cover is venting right now. I'm also curious if this device will fix my little leak from the left crank seal.
Quality....looks good to me. The canister is all aluminum, and the three fittings on it are replaceable if you could find some of the right size. That second input fitting should have been the size of the OEM valve cover vent hose, but it'll be OK with the adapter.
|
|
|
|
Post by Bluefront on Dec 6, 2010 5:10:47 GMT -5
In case anyone was wondering......there is very little pressure build-up inside this system. The line Scrappy provided is rated at 250psi, and the fittings and other lines I added are equally as strong. Any leaks would probably occur at the hose clamps. I would prefer to use spring clamps instead of the screw clamps in the kit, but finding the proper sized spring clamps would be difficult. There are several different sizes needed in my setup. I'll probably just use Scrappy's screw clamps.....they are high-quality. And....in case any leaks should develop while you're out riding, if you just disconnect the line to the canister, the passage through the fitting closes, and nothing can escape. You would have the valve cover line doing all the venting then. 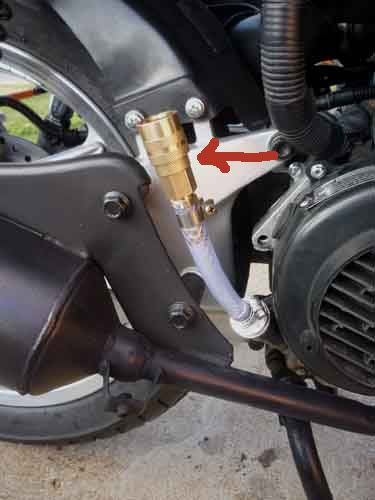 Also....you have to remove the "O"-ring from the OEM dipstick and reuse it on the new fitting, since the Scrappy kit didn't contain a new one. I'll probably find a new one somewhere. Also.....you should carry the old dipstick around with the scoot to check the oil level. I had an old cheap/thin 22mm open-end wrench I'll also carry around.....there's no easy way to tighten (or loosen) the fitting by hand, like the OEM dipstick. |
|
|
|
Post by Bluefront on Dec 6, 2010 10:48:21 GMT -5
Here's where it'll probably end up....... 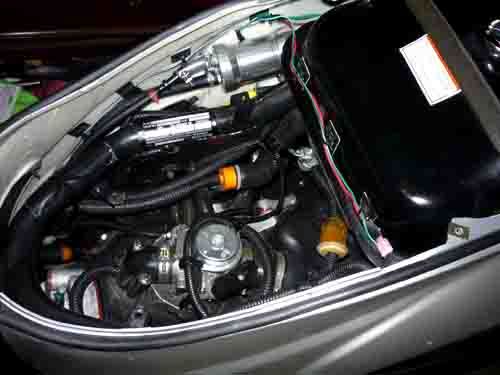 In theory.....the intake end of the canister should point downward (somewhat anyway), so any oil blown into the canister will drain back into the engine when the engine is stopped. In this location I can get a fair downward tilt. Mounted like this it is critical that the hose has free play, since it will be moving with the suspension. The alternative would be to mount the canister on a section of the engine/transmission/rear fender so the hose didn't need to move independently. It's going to take a while to figure out the best place.......more to come. |
|
|
|
Post by Bluefront on Dec 7, 2010 14:34:21 GMT -5
It's semi-permanently attached now, and I road it around for about 1/2 hour. It's 19 degrees or so and too cold for any more testing.....I don't anticipate any problems. No leaks noticed anywhere. Here's the routing of the vent hose. 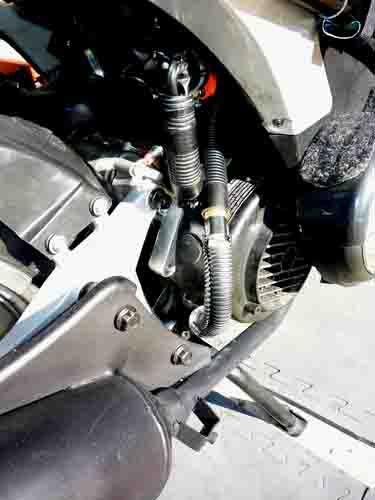 I found a new line adapter for the valve cover vent hose..... 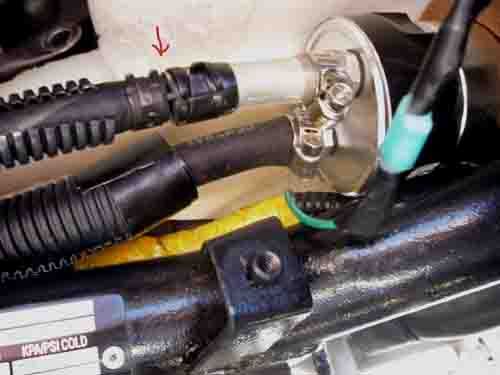 And the routing through the eng compartment. The red arrows are the new hose, the yellow arrows are the vent hose to the valve cover. 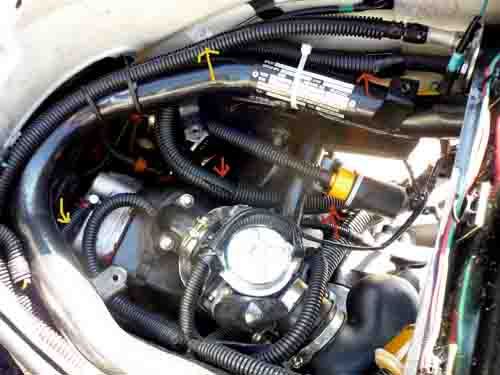 I temporarily attached a clear vinyl hose to the output from the PCV valve.....in order to see if any oil makes it through the system and out Scrappy's valve. Nothing noticed....the line has remained dry/clear so far. You can feel some vapor coming out...that's it.  Here's what I'll be carrying around from now on..... 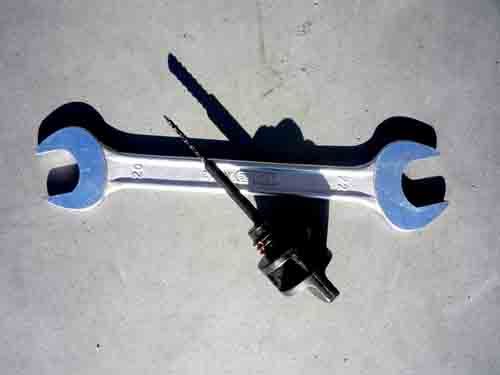 Here's a list of parts from Harbor Freight I bought for the quick-connect fitting..... 3ftx3/8" air hose lead #91294 4pc quick-coupler set #94024 3/8" barb fitting #95433 Seems to be working just fine so far......I'll update this project after more miles on it. ;D |
|
|
|
Post by Bluefront on Dec 7, 2010 15:09:33 GMT -5
One more thing here....I really don't understand how Scrappy's PCV valve can work very well, if at all. On a car the PCV valve opens when the engine is running, with the intake sucking in the fumes from the crankcase. On this setup presumably.....the valve is simply venting the fumes from the crankcase to the atmosphere by opening/closing using the varying pressure pulses from the crankcase (as the piston moves up/down). This means the spring-loaded PCV valve must be opening/closing at engine speed, in order to achieve a partial vacuum in the crankcase. Doesn't seem possible...... Perhaps this valve would actually work as a PCV valve, if the clear valve output line in the photos, was routed back to the engine intake.....there were no instructions with this device, or the aluminum catch-can either. Anybody who can clarify this thing.....please chime in.  Here's what Scrappy says about this valve..... "This nifty device actually creates a vacuum within your engine by only allowing air out, and not back in. Made in the USA all steel construction easily attaches to your vent line, which should be place above your engine as far as possible, and installed on the barbed nipple end. Threaded end is left open, or attached to a filter if you wish." |
|
|
|
Post by Bong on Dec 7, 2010 17:53:57 GMT -5
I too have been looking for more info on scrappys PCV valve. I installed one when going to a Free flow filter but, kept blowing the hose off the valve cover. Good luck and great project.
|
|
|
|
Post by Bluefront on Dec 9, 2010 19:11:09 GMT -5
Update.....did an oil change this morning. The quick fitting works just fine. Afterward I did a 60 mile road test.....no leaks, no incidents. There was no oil visible in the clear vinyl hose.....at the very end I could feel a very slight bit of oily vapor residue. This is about the same as the previous single vapor vent hose to the valve cover. A test at 35 degrees is not the same as testing this thing at 100 degrees however.....that hotter test will have to wait a few months.  |
|
|
|
Post by keetarider on Dec 11, 2010 2:55:54 GMT -5
Great Pics and Review as usual Blue. I know a lot of use were wondering how all that would go together. I'm wondering what the total cost ran you? I'm thinking you are getting very close to the total $60 price on Enviro's stainless steel set up. If you're within 5 bucks or so, I might order from Jeremy, so we can have a review on both of them. I know those guys both stand firmly behind their products and would probably welcome the print. Both have great stuff, and while Scrappy always has some of the best pricing around, sometimes he gets a rap for not having all the odds and ends(or instructions)needed. Jeremy on the other hand has slightly higher pricing, but also a little more attention to detail, and sells only what he actually uses for his own custom builds. This might be a great time to put that to task.  |
|
|
|
Post by Bluefront on Dec 11, 2010 5:31:23 GMT -5
Just from looking at the photo of Enviro's stainless catch tank, it's hard to tell everything. It looks to have a single port (inlet), and a fitting to replace the dipstick like Scrappy's. I guess the stainless tank is supposed to mount above the engine, allowing any oil to drain back.....either that or the tank has a lid to unscrew to dump the oil.
The stainless tank doesn't look to have an outlet port....which releases pressure buildup. Puzzling. Plus it only has the single inlet from the looks of it.
I wanted to use both vent hoses going into a single tank....which could be high-mounted, and could be self-draining back into the engine. Scrappy's does that.
The other thing......the hose going to the new vent on the dipstick hole will get very hard in cold weather, and will almost be impossible to remove without damaging the hose and causing leaks. That's why I went to the quick-connect fitting. If you check the oil daily like I do in the summer, that fitting will be much appreciated. The quick-connection could be installed on Enviro's setup also.
I may be wrong in my assessment of Enviro's stainless setup, as I'm only going by the single photo. If anybody actually has one.....please comment.
|
|
|
|
Post by Bong on Apr 29, 2011 17:14:04 GMT -5
So it's been a while now, any updates or thought on this setup??? The weather is getting warmer and I just ordered one yesterday for my little 50cc. I was wondering how things are working out for ya Bluefront. Any problems /comments??? I will skip the quick connect mod (for now) and possibly install a Leo vince pipe on my QMB. |
|
|
|
Post by Bluefront on Apr 29, 2011 18:19:01 GMT -5
Nothing much new to report......the setup is working well, with no leaks. However....I was hoping the setup would relieve enough crankcase pressure to stop the small crank seal leak I have (variator side). It hasn't done that. I'm going to have to replace that seal anyway.....  |
|
|
|
Post by Bong on Apr 29, 2011 19:47:05 GMT -5
Well, No news is good news to me. Nice to know things are working as they should. Thanks for the write up and pics Blue!!! I'll let ya know my results once it's installed. |
|
|
|
Post by Bong on Apr 30, 2011 15:43:29 GMT -5
Well, I got mine today and your absolutely right about the valve cover hose. There is no way that hose will fit on the other nipple. Where did ya get that hose enlarger/reducer? Something I can get at Home Depot? I may just replace the nipple with something smaller if I can find one  Would it be possible just to screw in the PCV valve at the vent instead of attaching it with a hose? Also, I had quit a bit of slag left on the dipstick threads. Easy enough to remove but, I'm glad you mentioned using the old rubber seal as mine came without one too. Edit- Never mind the PCV valve has to be attached with the barbed end not the screw |
|
|
|
Post by Bluefront on Apr 30, 2011 16:51:12 GMT -5
I made no attempt to find another nipple to fit the smaller hose. That would require a small miracle. I got the hose reducer at Ace Hardware....you might find one at Home Depot maybe.
|
|
|
|
Post by Bong on May 5, 2011 12:37:36 GMT -5
|
|
|
|
Post by ariot on May 16, 2011 16:18:03 GMT -5
Please excuse my ignorance, but why would you put on something like that when there is a vent tube for the crankcase? It does make it more difficult to check your 710, having to take it off then use your dipstick then put that contraption back on, seems redundant.
|
|
|
|
Post by Bluefront on May 16, 2011 18:00:16 GMT -5
The problem is that the stock crankcase vent hose is very small.....way too small from the looks of it. This can cause excessive crankcase pressure......causing leaks and excessive oil usage. The extra vent hose setup should fix that potential issue......so the theory goes.  |
|
|
|
Post by ariot on May 17, 2011 10:54:05 GMT -5
Here is a thought, use valve cover vents I have used them on air cooled VW's for years and they work and connect to a breather box. This link will show what I'm talking about, and maybe give you some ideas. www.jbugs.com/product/8544.html |
|
|
|
Post by Bluefront on May 17, 2011 12:46:38 GMT -5
Well that setup would work to vent the crankcase.....but the Scrappy catch-tank is somewhat different. Rather than simply venting the system to the atmosphere, the catch tank does what it's name implies. If mounted higher than the engine, it catches any oil blown into it, and allows the oil to drain back into the engine after the engine stops.
A simple vent hose like what's on there, can't do that. FWIW....the diameter of the stock vent hose on my 150cc scoot is the same as the vent hose on my 50cc scoot. Too small for effective venting in my estimation.....
|
|
|
|
Post by ariot on May 17, 2011 14:36:58 GMT -5
There is virtually no oil in the collector when I have checked them, and after years of cleaning the small filter I couldn't get more than an ounce or so at best. The oil drains back from where came from and if it can handle a 2L hi performance engine a scoot should be no problem.
|
|
|
|
Post by Bluefront on May 17, 2011 15:57:54 GMT -5
Single cylinder engines are much worse with this vent thing than multi-cylinder engines. On a twin cylinder engine for instance, one piston could be going up while the other is going down.....not much pressure in the crank-case. You really need a big vent with a single.....IMO.
^^^^that last example is only a "for instance". A four cylinder car engine may be a better example. If I open up the dip stick hole on my Ford Focus, nothing splashes out.....try that on your GY6 engine and oil flies everywhere.
|
|
|
|
Post by Bong on May 17, 2011 15:58:40 GMT -5
Usually just an old fuel filter at the end of the vent hose works just fine. My 50cc was set up like that for quite a while but, for looks and just a cool what is that factor. The catch can Rules !!! Also in my case, the extra vent on the dipstick did help with a small oil leak. I still need to replace the seal but until then it helped a bit You don't need to use the dipstick portion it still works fine as a catch can and looks better than a homemade solution IMO. |
|