|
|
Post by Bluefront on Apr 2, 2010 14:55:35 GMT -5
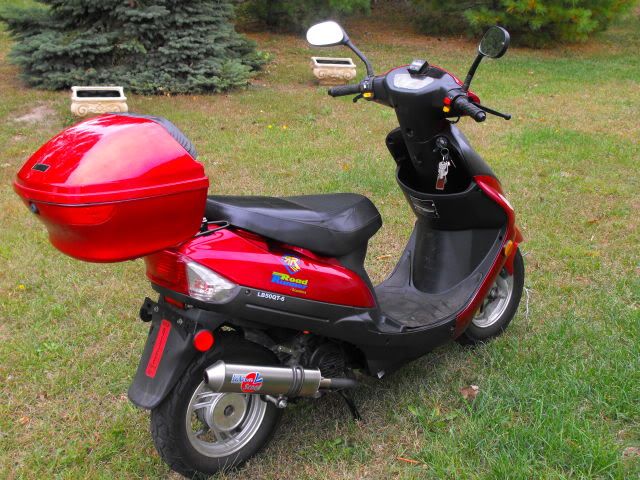
Well I finally broke down and decided to do the upgrade to 72CC. I acquired two kits from the cheapest source I could find (E-Bay). Don't ask where....the place is not one of our sponsors. I got two kits so I would have spare pieces in case the worst happens. I was interested in the quality of these kits....so I did a close examination, using appropriate tools. 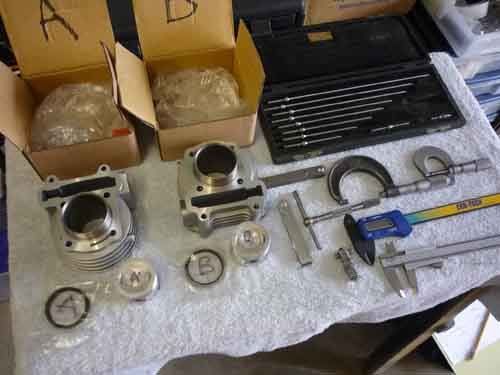  The gasket surfaces look perfect...couldn't get any better. The bore surface and the piston look of the same quality as any other cylinder/piston I've ever seen (a bunch). 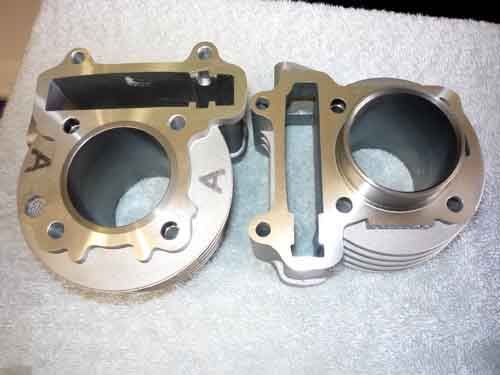 These cylinders come tapped out for an oil cooler (or a pressure gauge I suppose). Supply your own bolt as a stopper if you're not using it. (6mmx1.0). 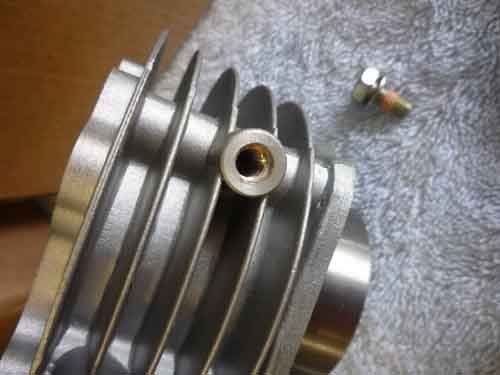 Measurements....the difference in the bore size between the two cylinders is .0005 (that's 1/2 a thousand of an inch, and hard to measure with my tools) The pistons measured exactly the same at all points. Ring gaps.....all except one measured .005-.008". One oil ring had a gap of .002 (needs to be widened slightly). The piston diameters.....1.84", and the bore diameters 1.85". (that's as close as I could measure accurately. My bore gauge set won't go down that small, so I used a caliper instead. Overall....these sets look good to me. I'm not worrying about the quality. If you need hand-holding during the install of these kits, you might consider ordering from somebody who has a good track record of support. Happy modding.....I'm going to start this job shortly. Hopefully I won't need any help.  |
|
|
|
Post by ILLGotti on Apr 2, 2010 17:12:24 GMT -5
nice post! +1 for you. I wish you were planning on doing the oil cooler route, so we could see that!
|
|
|
|
Post by Bluefront on Apr 2, 2010 17:32:28 GMT -5
^^^Funny you asked. I should have a perfect oil cooler among my junk collection. It's a power steering oil cooler off a Nissan......just don't seem to be able to find it. I saw it in the basement last year when I was cleaning. Just can't find it right now...... That tapped passage is right into the oil pressure channel to the cam bearings. You'd only need to add an opening to the crankcase to drain the cooled oil (I suppose  |
|
|
|
Post by rocketdog on Apr 2, 2010 18:17:23 GMT -5
Nice work there Blue. A bone fer you. The two no brand BBK I've seen were both good enough as well. The only thing, I think, that might be iffy is the pistons. Not that they aren't as good as stock. But that they aren't a bit better. Bigger valves wouldn't hurt an 85 at all and is worth a try on a 72. The valve reliefs are the same width as the stock 49cc head. Bigger valves and they don't match. Ya either have to fly cut the kits piston or have one custom made. At least as far as I've been able to ascertain. NCYs cylinder head is as good as anything for a GY6 I've ever seen. You can bolt one up without any piston to valve clearance issues. On mine you could, I clayed it and cc'ed the head. Both the stock one and the NCY. But your compression ratio goes south. A lot. 5.2ccs stock, 6.1ccs NCY. If you mill the head to make up the difference you get into valve clearance problems because of the valve pockets. 90GT told me it was like that, but I can be hard headed. So a nice after market piston for a 47-50mm would be a grand thing. Trouble is Wesco likes money way too much for a custom job. Perhaps find the thickest no brand and fly cut that. Then mill it.
RD
|
|
|
|
Post by Bluefront on Apr 2, 2010 19:15:03 GMT -5
I really don't want to get into any machine shop work.....this is going to be a bolt-on upgrade only. After about 1k miles total between my two scoots, I find the need for a little more hill climbing ability. The variator weight change I had to do on my Eagle helped it a bunch, and this Roketa didn't need any different weights. Both scoots stay over 6k hill-climbing. But I loose too much speed on the many hills around here.
If this 72cc BBK doesn't do the trick, I may go to a bigger cc scoot entirely.
Thanks for the bones....
|
|
|
|
Post by rocketdog on Apr 2, 2010 19:38:57 GMT -5
With the stock head it will do well. I've been working on a 50 and I was just mentioning the piston problems that one might encounter. You were talking about the quality and so I thought I might bring it up. I bet it will do 50, with the right gearing, np. More, perhaps. Luck.
RD
|
|
|
|
Post by Enviromoto on Apr 2, 2010 20:44:24 GMT -5
Of all the people I thought would never go bigbore  Welcome to the dark side  |
|
|
|
Post by Bluefront on Apr 4, 2010 7:03:08 GMT -5
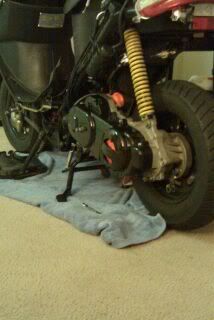
Heh....I don't really consider a 72cc kit like these much of a gamble. The engine was this size when first designed by Honda, from what I've read. And throughout Asia they use this size cylinder/piston as standard. But I've found I tend to run WOT much more often than I ever thought I would.......and that's <35mph also. Hopefully this upgrade will make life easier for me on the hills. Also.....any sort of headwind really slows me down. My weight and size aren't helping matters either.....but I'm stuck being a big person. I'm hoping to do this upgrade without removing the engine from the frame....I think I can do it by just removing some plastic. I'll find out. |
|
|
|
Post by cyberbeer65 on Apr 4, 2010 7:46:46 GMT -5
I'm hoping to do this upgrade without removing the engine from the frame....I think I can do it by just removing some plastic. I'll find out. I didn't remove the engine from my scoot when I installed my bbk. I just removed some plastic. |
|
|
|
Post by ILLGotti on Apr 4, 2010 16:38:36 GMT -5
I did my BBK while the motor was in, I did my REBUILD on the table. SO MUCH EASIER!!!!
|
|
|
|
Post by meitianman on Apr 4, 2010 18:00:49 GMT -5
easiest way to do it without removing the engine is by removing the plastics around the engine and unbolting the shock where it connects on the transmission case. if you do this after putting the scoot on the center stand ontop of a 4X4 piece of wood it lets the engine drop down enough in the rear to angle the head upwards making it MUCH easier.
|
|
|
|
Post by ron521 on Apr 4, 2010 19:07:29 GMT -5
I definitely would like to hear how your scooter performs with the kit installed, hopefully with no other mods to illustrate how much extra is gained just from the kit.
|
|
|
|
Post by Bluefront on Apr 4, 2010 19:28:24 GMT -5
Thanks for the tips.....I'll for sure un-hook a shock bolt so the engine tips up slightly. That's a good one. The only other mod I anticipate after the BBK install is a bigger main jet.....maybe a pilot jet. Right now with about 700miles on the odometer, I've seen 41-43mph on a level road, no head wind (This scoot seems to be getting faster every day). The main jet right now is #84...it came stock with a #80. But I'm really interested in hill climbing. I've got a few hills around here with a stop sign at the bottom. I can make a few WOT runs and register the mph near the top (about 1/4 mile). After the new cylinder is installed and broken in......I'll repeat the test and hopefully register a higher speed. That'll take a while though. |
|
|
|
Post by ILLGotti on Apr 4, 2010 22:02:38 GMT -5
I found with 47mm a #90 jet does me just right. I am still running the #34 pilot jet, although I DO HAVE a #38. I will probably use the #38 pilot jet on this new 50mm kit with a #92 or #95 main. I don't think you NEED it with the 47mm kits. And since your pilot jet has nothing to do with WOT your not gonna see much difference. I suppose its possible to gain a little in the 1/4-3/4 throttle area, but I don't know for sure, since I havn't installed mine yet
|
|
|
|
Post by gctkaz on Apr 4, 2010 23:01:39 GMT -5
Just wanted to say, I installed a 72cc kit (with head) from eBay this morning. I've never done any engine work before, all my mechanical experience only came from tinkering with bicycles throughout the last few years, and boy this was a totally different beast, really intimidating for me.
Anyway, I managed to do the installation with only removing the seat bucket/exhaust/battery compartment on my Lifan LF50QT-2A. Didn't need to unbolt the shock at all.
I was thinking of changing my rollers before I installed the BBK, but now it's already giving me great acceleration. I'll find an excuse to give it a full test ride tomorrow.
|
|
|
|
Post by wketchin on Apr 4, 2010 23:40:35 GMT -5
Nice :thumbsup:
|
|
|
|
Post by Bluefront on Apr 5, 2010 5:43:27 GMT -5
The jet size you use on these scoots does have an impact on the performance for sure, and I hesitate to recommend a particular size with a simple BBK install and nothing else. You really need to know how to read the signs of improper main jet sizes. My setup right now is using this paper air-filter I made..... 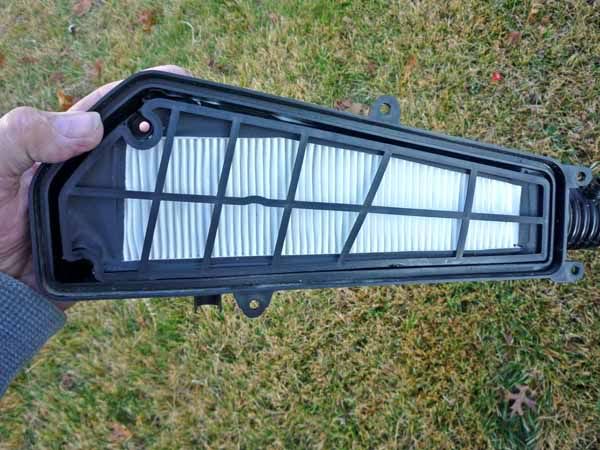 This filter seems to be slightly more restrictive than the OEM filter, requiring a slightly smaller jet size than what you would expect with the foam filter. As I said I'm now using a #84 main, with the needle raised to it's richest position. This scoot came with an internal snorkel in the air-box, and a cap with restrictions over the air-box intake. I removed the snorkel and the cap and the scoot ran really lean (hardly would run). The more restrictive filter and the jetting changes got it running pretty good. I'm expecting a few more jetting experiments after the BBK installation.....unless plans change, I'll continue using this paper filter. So any jet size I might mention on my setup, probably won't be the best size for a BBK of 72cc, and no other mods. |
|
|
|
Post by ron521 on Apr 11, 2010 8:09:21 GMT -5
I've ordered (I believe) the same kit, seller states in the ad that wrist pin may be .050" too long, but I am prepared to machine it if needed to make it work.
Looking forward to installing it and finding out how well it works.
|
|
|
|
Post by wketchin on Apr 11, 2010 12:50:03 GMT -5
I've ordered (I believe) the same kit, seller states in the ad that wrist pin may be .050" too long, but I am prepared to machine it if needed to make it work. Looking forward to installing it and finding out how well it works. Yeah grinding it was a bitch. |
|
|
|
Post by ron521 on Apr 13, 2010 6:22:25 GMT -5
I found grinding the wrist pin to be very easy, holding the wrist pin in a portable drill and lightly touching it to a bench grinder. Took only a few minutes, and no effort at all.
If you try it this way, stop frequently to check your measurement, as it is very easy to remove metal, but difficult to put it back on.
|
|
|
|
Post by Bluefront on Apr 17, 2010 16:26:37 GMT -5
Checked my kits today (still waiting to be installed), and sure enough the pins were too long. Here's the before measurement... 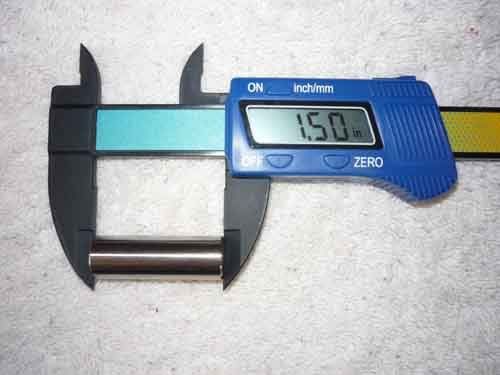 I ground mine down with a bench grinder, after dressing up (leveling) the grinder wheel surfaces. I just held the pin, turning it briskly as I went. After every twenty seconds or so, I remeasured it. I've done things like this before....you do use both hands, with my right hand pushing and turning. It's easy... 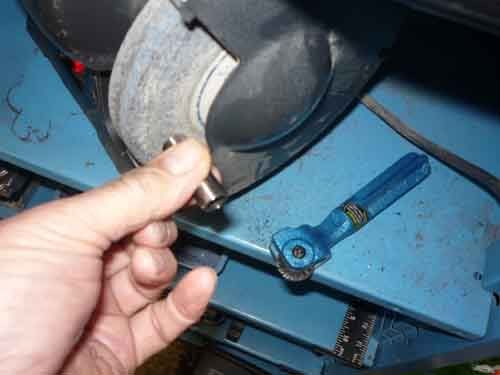 Here's the final measurement.... 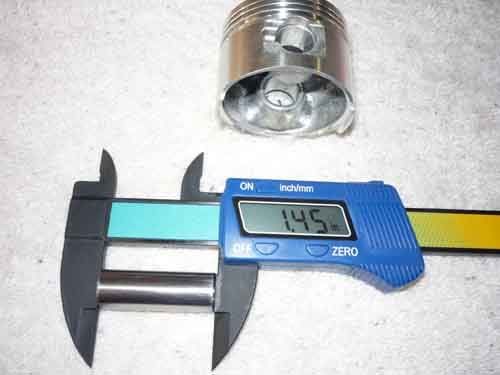 Make sure you test this before installation. Install both clips and the pin in the piston.....reach your fingers inside the piston and turn the pin. It should turn easily, indicating the pin is not being pinched by the clips.....there should be a little clearance. This little issue was no big deal to me (only took a few minutes)....but it might be to someone without a bench grinder. No way I'd want to use a file. A lathe would have been easier, but I don't have one.  |
|


 .
.